


This article shows you how to use GetX (also known as Get) to manage states in Flutter. We are going to build a simple app that displays a list of given products (you can fetch these things from an API or a database as well). A user can add or remove some products from a place called a wish list.
Note: This article was recently updated to fix some bugs related to null safety and work properly with the latest versions of Flutter and GetX (you will also notice that a lot of const keywords were added, and Material 3 design was used). You should use Flutter 3.3.3 or later.
To keep this tutorial clean and easy to understand, we will only use the state management feature of GetX and ignore the other stuff provided by this excellent library.
Note: GetX provides a bunch of features but it is not bloated. If you only use State Management, only State Management will be compiled. Therefore, you can use it with complete peace of mind without having to worry that your application will be larger than necessary.
Overview
You can make any variables become observable using a simple “.obs”, like this:
import 'package:get/get.dart';
/* ... */
class MyController extends GetxController{
  var myList = [].obs;
  var myNumber = 0.obs;
  var myString = 'abcdef'.obs;
  /* ... */
}
Instantiate your class using Get.put() to make it available for all “child” routes there:
final MyController _controller = Get.put(MyController());Use Obx to wrap the specific widget that will be updated whenever one or many observable variables inside it change, like this:
Obx(() => Text("${_controller.myString}")),
Obx(() => Text("${_controller.myNumber.toString()}")),
/* ... */
For more clarity, see the full example below.
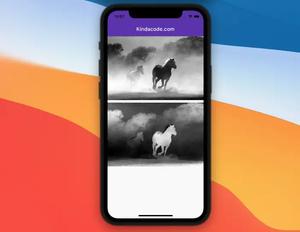
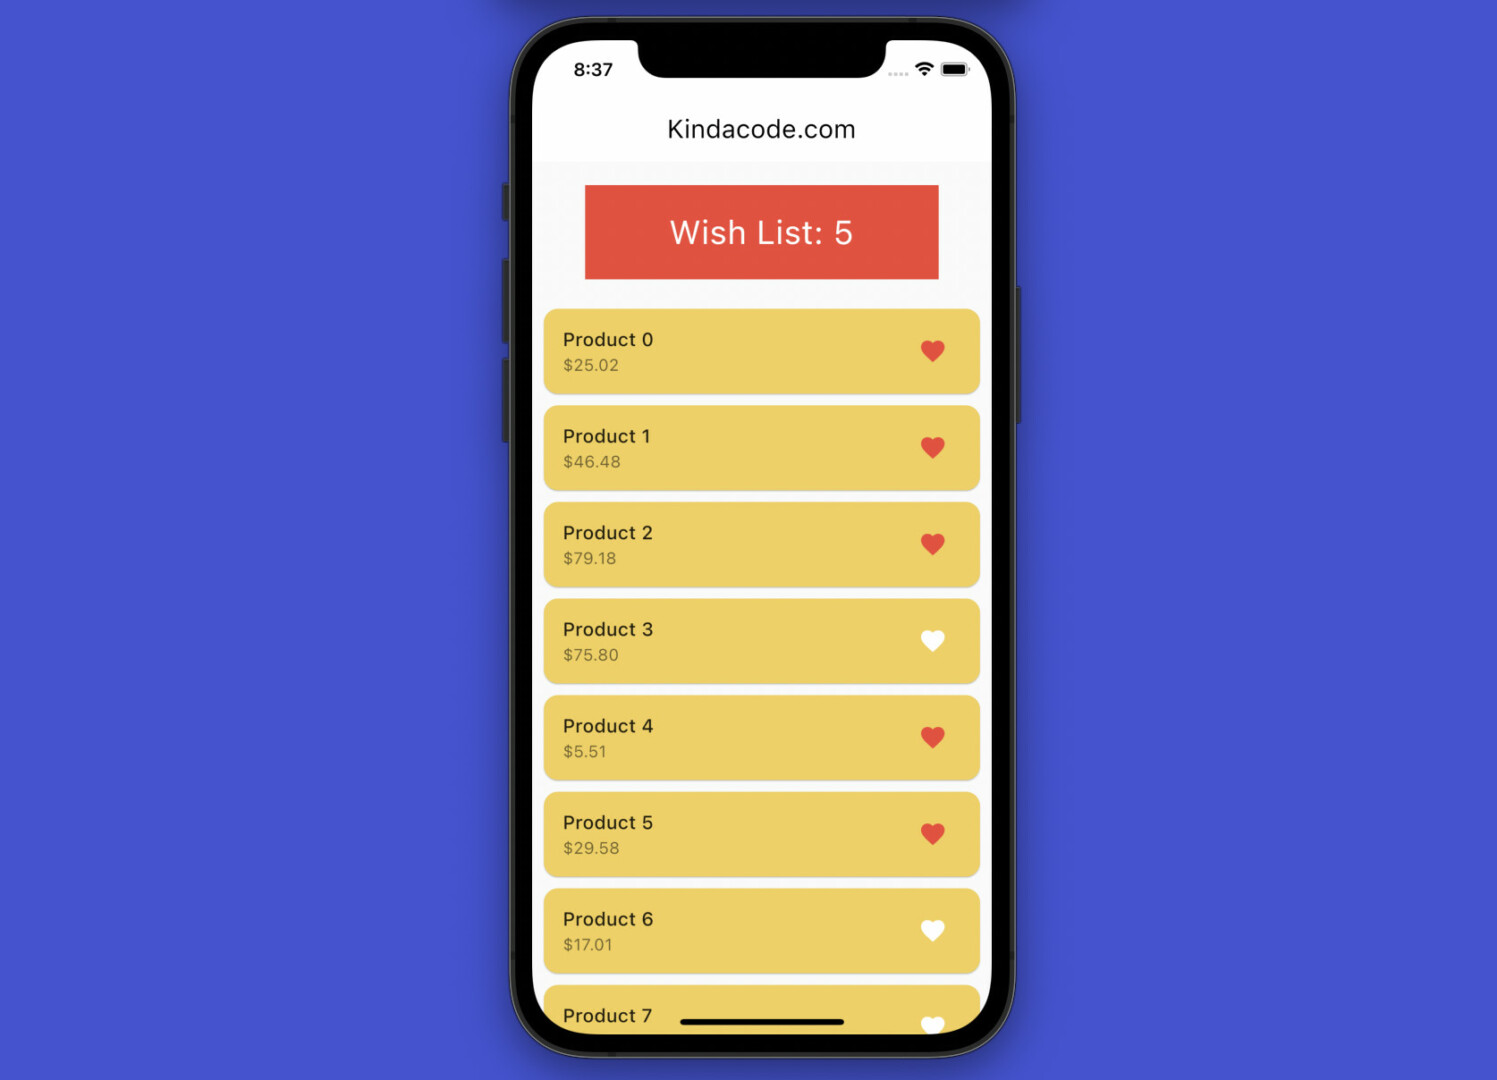
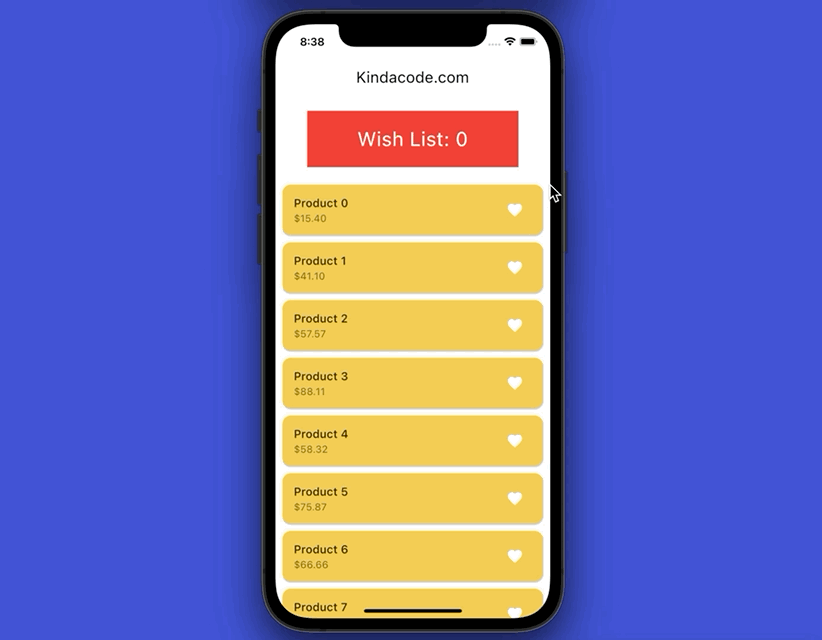
App Preview
Our app has 2 screens: HomeScreen and WishListScreen:
- HomeScreen contains a button and a list view. The button shows how many products have been added to the wish list and lets you navigate to WishListScreen. The list view displays all products. Each product has a heart icon whose color can be red or white.
- WishListScreen displays a list view that contains only some products chosen by the user. Each product here can be removed easily.
An animated GIF demo is worth more than a thousand words:
Getting Started
Note: In the scope of this article, “item” and “product” are interchangeable.
1. Create a new Flutter project:
flutter create get_state_exampleAnd install GetX by running this command:
flutter pub add get2. In the /lib folder, add new files and folders as shown below:
.
├── main.dart
├── models
│   └── item.dart
├── screens
│   ├── home_screen.dart
│   └── wish_list_screen.dart
└── state
    └── products.dart
Except for the main.dart file which has default code, the other files are empty.
It can seem redundant when some folders contain only one file in them. However, this makes it easy to expand your project in the future without changing the directory structure.
Working With State
3. Define how a product looks like by creating a class named Item in your models/item.dart file:
// model/item.dart
import 'package:get/get.dart';

class Item {
  int id;
  String name;
  double price;
  RxBool
      inWishList; // Make inWishList observable by using the RxBool type and adding ".obs" (".obs" will be added in the Products class).
  Item(
      {required this.id,
      required this.name,
      required this.price,
      required this.inWishList});
}
4. The Products class is our business logic class. We also have methods for handling the addition (addItem() method) or removal (removeItem() method) of items from the wish list.
In order to make _items variable observable, we use “.obs”.
// state/products.dart
import 'package:get/get.dart';
import 'dart:math';
import '../models/item.dart';

class Products extends GetxController {
  // All products
  // In production, these things usually be loaded them from API or database or something like that
  final RxList<Item> _items = List.generate(
      100,
      (index) => Item(
          id: index,
          name: 'Product $index',
          price: Random().nextDouble() * 100,
          inWishList: false.obs)).obs;

  // Use this to retrieve all products
  List<Item> get items {
    return [..._items];
  }

  // This will return the products that were added to wish list
  List<Item> get wishListItems {
    return _items.where((item) => item.inWishList.value == true).toList();
  }

  // Add an item to the wish list
  void addItem(int id) {
    final int index = _items.indexWhere((item) => item.id == id);
    _items[index].inWishList.value = true;
  }

  // Remove an item from the wish list
  void removeItem(int id) {
    final int index = _items.indexWhere((item) => item.id == id);
    _items[index].inWishList.value = false;
  }
}
Working With Screens
5. Our HomeScreen presents all products and informs us how many items have been added to the wish list.
// screens/home_screen.dart
import 'package:flutter/material.dart';
import 'package:get/get.dart';

import '../state/products.dart';
import 'wish_list_screen.dart';

class HomeScreen extends StatelessWidget {
  // Instantiate our Products class using Get.put()
  final Products _p = Get.put(Products());

  HomeScreen({Key? key}) : super(key: key);

  @override
  Widget build(BuildContext context) {
    return Scaffold(
      appBar: AppBar(
        title: const Text('Kindacode.com'),
      ),
      body: Column(
        children: [
          const SizedBox(
            height: 20,
          ),
          // This button also shows you how many items in the wish list
          // It lets you go to the WishListScreen
          InkWell(
            child: Container(
              width: 300,
              height: 80,
              color: Colors.red,
              alignment: Alignment.center,
              // Use Obx(()=> to update Text() whenever _wishList.items.length is changed
              child: Obx(() => Text(
                    'Wish List: ${_p.wishListItems.length}',
                    style: const TextStyle(fontSize: 28, color: Colors.white),
                  )),
            ),
            onTap: () => Navigator.push(context,
                MaterialPageRoute(builder: (context) => WishListScreen())),
          ),

          const SizedBox(
            height: 20,
          ),

          Expanded(
              // Display all products in home screen
              child: ListView.builder(
                  itemCount: _p.items.length,
                  // List item widget
                  itemBuilder: (context, index) {
                    final product = _p.items[index];
                    return Card(
                      key: ValueKey(product.id),
                      margin: const EdgeInsets.symmetric(
                          vertical: 5, horizontal: 10),
                      color: Colors.amber.shade300,
                      child: ListTile(
                        title: Text(product.name),
                        subtitle: Text("\$${product.price.toStringAsFixed(2)}"),
                        // Use Obx(()=> to update icon color when product.inWishList change
                        trailing: Obx(() => IconButton(
                              onPressed: () {
                                if (product.inWishList.value == false) {
                                  _p.addItem(product.id);
                                } else {
                                  _p.removeItem(product.id);
                                }
                              },
                              icon: Icon(
                                Icons.favorite,
                                color: product.inWishList.value == false
                                    ? Colors.white
                                    : Colors.red,
                              ),
                            )),
                      ),
                    );
                  })),
        ],
      ),
    );
  }
}
6. Here’s the code for WishListScreen:
// screens/wish_list_screen.dart
import 'package:flutter/material.dart';
import 'package:get/get.dart';
import '../state/products.dart';

class WishListScreen extends StatelessWidget {
  // Ask Get to find our "controller"
  final Products _p = Get.find<Products>();

  WishListScreen({Key? key}) : super(key: key);

  @override
  Widget build(BuildContext context) {
    return Scaffold(
        appBar: AppBar(
          title: const Text('WishList'),
        ),
        body: Obx(
          () => ListView.builder(
            itemCount: _p.wishListItems.length,
            itemBuilder: (context, index) {
              final item = _p.wishListItems[index];
              return Card(
                key: ValueKey(item.id),
                margin: const EdgeInsets.symmetric(vertical: 5, horizontal: 10),
                color: Colors.blue[200],
                child: ListTile(
                  title: Text(item.name),
                  subtitle: Text(item.price.toStringAsFixed(2)),
                  // This button use to remove )the item from wish list
                  trailing: IconButton(
                    icon: const Icon(Icons.close),
                    onPressed: () {
                      item.inWishList.value = false;
                      _p.removeItem(item.id);
                    },
                  ),
                ),
              );
            },
          ),
        ));
  }
}
7. Last but not least, replace the default code in main.dart with the following:
// kindacode.com
// main.dart
import 'package:flutter/material.dart';
import './screens/home_screen.dart';

void main() {
  runApp(const MyApp());
}

class MyApp extends StatelessWidget {
  const MyApp({Key? key}) : super(key: key);

  @override
  Widget build(BuildContext context) {
    return MaterialApp(
      // Remove the debug banner
      debugShowCheckedModeBanner: false,
      title: 'Kindacode.com',
      theme: ThemeData(
          // enable Material 3
          useMaterial3: true,
          primarySwatch: Colors.indigo),
      home: HomeScreen(),
    );
  }
}
Now run the project with your iOS simulator or Android emulator and check the result.
Note: You can use GetX for both wide app state and ephemeral state (UI state or local state). That’s why we didn’t use StatefulWidget and call setState() for the local state of HomeScreen in our example.
Learn more about GetX:
- Using GetX (Get) for Navigation and Routing in Flutter
- Using GetX to make GET/POST requests in Flutter
- Flutter: Uploading Files with GetConnect (GetX)
Conclusion
Using Get is one of the easiest and neatest ways to manage the states of an application. You don’t have to write much code so that your project will be leaner and painless to maintain. If you’d like to explore more new and interesting things about Flutter, take a look at the following articles:
- Flutter: Save and Retrieve Colors from Database or File
- Most Popular Packages for State Management in Flutter
- Flutter: Make a simple Color Picker from scratch
- Working with Time Picker in Flutter
- Sorting Lists in Dart and Flutter (5 Examples)
You can also check out our Flutter category page, or Dart category page for the latest tutorials and examples.


