


Hive is a lightweight key-value database that can be used to store data locally in mobile, desktop, and web applications. It is written in pure Dart and works very well with Flutter. CRUD means create, read, update, and delete, the four essential operations of persistent storage.
In this article, we’re going to build a full-featured and quite useful app with Hive and Flutter.
Note: This tutorial was lately updated to work well with Flutter 3.3.10 (the latest version at the time of editing). Make sure you don’t use a too ancient version of the framework.
Overview
The basics
Some of the great advantages of Hive:
- Easy to use, just like Dart maps. You don’t have to write long and complicated queries to query data.
- High flexibility. You can change your data structure easily because Hive doesn’t use tables like SQLite.
- No native dependencies
- Fast and can handle a large amount of data.
- Supports primitives (string, number, list, map, etc.) and Dart objects (with the help of adapters)
In order to use Hive in Flutter, you need to install the hive plugin and the hive_flutter plugin.
You can initialize Hive in the main() function of your app:
void main() async {
  /*... */
  await Hive.initFlutter();
  /*...*/
}
All data stored in Hive is organized in boxes. A box can be compared to a table in SQL, but it does not have a structure and can contain anything. You can open a box like this:
await Hive.openBox('shopping_box'); // the name is totally up to youOnce a box is open, all its data from the local storage is loaded into memory for immediate access. You can retrieve data synchronously without using async/await:
final myBox = Hive.box('shopping_box');
final something = myBox.get('my_key');
Adding a new item to the box:
await myBox.put('some_key', someValue);Updating an existing item in the box:
await myBox.put('some_key', someValue);Deleting an item in the box:
await myBox.delete('some_key');Storing a list of items with auto-increment keys
You can save a list of items with Hive easily by using the add() method. In this case, the keys are auto-generated and auto-increment, starting from 0, then 1, 2, 3, and so on. For example:
final listBox = Hive.box('my_list');
int newKey = await listBox.add(someData);
You can retrieve all keys and values from the box like this:
final keys = listBox.keys;
final values = listBox.values;
You can use loops with keys and values as needed. In cases where you prefer to create and set your own keys (by using the put() method as mentioned earlier), using DateTime.now().toString() is a good idea. You can also find some other useful techniques in this article: Flutter & Dart: 3 Ways to Generate Random Strings.
The Complete Example
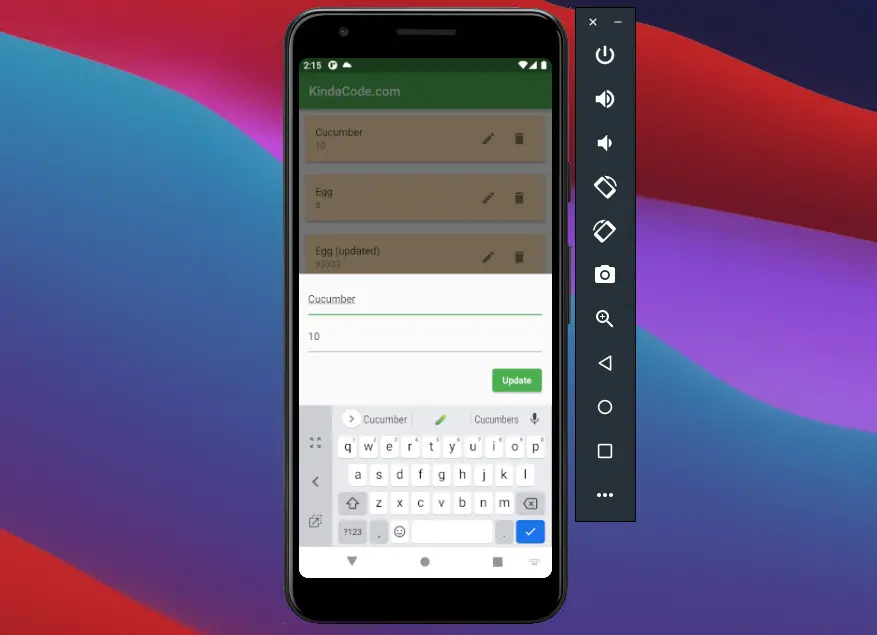
App Preview
Imagine your wife or your mom is cooking a big dinner and she asks you to go to a store nearby to get her some ingredients. It’s hard to memorize those things, so you seek a pen and paper to scribble them down. However, you cannot find what you need. Here the rescuer comes in. It’s a shopping list app that can run totally offline without an internet connection.
The shopping list app we are talking about has a floating button. When this button is pressed, a bottom sheet with text fields will appear so that you add a new item (including its name and quantity) and store it in the Hive database.
All saved items are displayed in a list view. Associating with each item is an edit button and a delete button, used for updating and deleting the item, respectively.
Here’s how our app works:
The Code
Installing hive and hive_flutter by running:
dart pub add hiveAnd:
flutter pub add hive_flutterThe full source code in main.dart with detailed explanations:
// main.dart
import 'package:flutter/material.dart';
import 'package:hive/hive.dart';
import 'package:hive_flutter/hive_flutter.dart';

void main() async {
  WidgetsFlutterBinding.ensureInitialized();

  await Hive.initFlutter();
  // await Hive.deleteBoxFromDisk('shopping_box');
  await Hive.openBox('shopping_box');

  runApp(const MyApp());
}

class MyApp extends StatelessWidget {
  const MyApp({Key? key}) : super(key: key);

  @override
  Widget build(BuildContext context) {
    return MaterialApp(
      debugShowCheckedModeBanner: false,
      title: 'KindaCode.com',
      theme: ThemeData(
        primarySwatch: Colors.green,
      ),
      home: const HomePage(),
    );
  }
}

// Home Page
class HomePage extends StatefulWidget {
  const HomePage({Key? key}) : super(key: key);

  @override
  State<HomePage> createState() => _HomePageState();
}

class _HomePageState extends State<HomePage> {
  List<Map<String, dynamic>> _items = [];

  final _shoppingBox = Hive.box('shopping_box');

  @override
  void initState() {
    super.initState();
    _refreshItems(); // Load data when app starts
  }

  // Get all items from the database
  void _refreshItems() {
    final data = _shoppingBox.keys.map((key) {
      final value = _shoppingBox.get(key);
      return {"key": key, "name": value["name"], "quantity": value['quantity']};
    }).toList();

    setState(() {
      _items = data.reversed.toList();
      // we use "reversed" to sort items in order from the latest to the oldest
    });
  }

  // Create new item
  Future<void> _createItem(Map<String, dynamic> newItem) async {
    await _shoppingBox.add(newItem);
    _refreshItems(); // update the UI
  }

  // Retrieve a single item from the database by using its key
  // Our app won't use this function but I put it here for your reference
  Map<String, dynamic> _readItem(int key) {
    final item = _shoppingBox.get(key);
    return item;
  }

  // Update a single item
  Future<void> _updateItem(int itemKey, Map<String, dynamic> item) async {
    await _shoppingBox.put(itemKey, item);
    _refreshItems(); // Update the UI
  }

  // Delete a single item
  Future<void> _deleteItem(int itemKey) async {
    await _shoppingBox.delete(itemKey);
    _refreshItems(); // update the UI

    // Display a snackbar
    if (!mounted) return;
    ScaffoldMessenger.of(context).showSnackBar(
        const SnackBar(content: Text('An item has been deleted')));
  }

  // TextFields' controllers
  final TextEditingController _nameController = TextEditingController();
  final TextEditingController _quantityController = TextEditingController();

  // This function will be triggered when the floating button is pressed
  // It will also be triggered when you want to update an item
  void _showForm(BuildContext ctx, int? itemKey) async {
    // itemKey == null -> create new item
    // itemKey != null -> update an existing item

    if (itemKey != null) {
      final existingItem =
          _items.firstWhere((element) => element['key'] == itemKey);
      _nameController.text = existingItem['name'];
      _quantityController.text = existingItem['quantity'];
    }

    showModalBottomSheet(
        context: ctx,
        elevation: 5,
        isScrollControlled: true,
        builder: (_) => Container(
              padding: EdgeInsets.only(
                  bottom: MediaQuery.of(ctx).viewInsets.bottom,
                  top: 15,
                  left: 15,
                  right: 15),
              child: Column(
                mainAxisSize: MainAxisSize.min,
                crossAxisAlignment: CrossAxisAlignment.end,
                children: [
                  TextField(
                    controller: _nameController,
                    decoration: const InputDecoration(hintText: 'Name'),
                  ),
                  const SizedBox(
                    height: 10,
                  ),
                  TextField(
                    controller: _quantityController,
                    keyboardType: TextInputType.number,
                    decoration: const InputDecoration(hintText: 'Quantity'),
                  ),
                  const SizedBox(
                    height: 20,
                  ),
                  ElevatedButton(
                    onPressed: () async {
                      // Save new item
                      if (itemKey == null) {
                        _createItem({
                          "name": _nameController.text,
                          "quantity": _quantityController.text
                        });
                      }

                      // update an existing item
                      if (itemKey != null) {
                        _updateItem(itemKey, {
                          'name': _nameController.text.trim(),
                          'quantity': _quantityController.text.trim()
                        });
                      }

                      // Clear the text fields
                      _nameController.text = '';
                      _quantityController.text = '';

                      Navigator.of(context).pop(); // Close the bottom sheet
                    },
                    child: Text(itemKey == null ? 'Create New' : 'Update'),
                  ),
                  const SizedBox(
                    height: 15,
                  )
                ],
              ),
            ));
  }

  @override
  Widget build(BuildContext context) {
    return Scaffold(
      appBar: AppBar(
        title: const Text('KindaCode.com'),
      ),
      body: _items.isEmpty
          ? const Center(
              child: Text(
                'No Data',
                style: TextStyle(fontSize: 30),
              ),
            )
          : ListView.builder(
              // the list of items
              itemCount: _items.length,
              itemBuilder: (_, index) {
                final currentItem = _items[index];
                return Card(
                  color: Colors.orange.shade100,
                  margin: const EdgeInsets.all(10),
                  elevation: 3,
                  child: ListTile(
                      title: Text(currentItem['name']),
                      subtitle: Text(currentItem['quantity'].toString()),
                      trailing: Row(
                        mainAxisSize: MainAxisSize.min,
                        children: [
                          // Edit button
                          IconButton(
                              icon: const Icon(Icons.edit),
                              onPressed: () =>
                                  _showForm(context, currentItem['key'])),
                          // Delete button
                          IconButton(
                            icon: const Icon(Icons.delete),
                            onPressed: () => _deleteItem(currentItem['key']),
                          ),
                        ],
                      )),
                );
              }),
      // Add new item button
      floatingActionButton: FloatingActionButton(
        onPressed: () => _showForm(context, null),
        child: const Icon(Icons.add),
      ),
    );
  }
}
Conclusion
You’ve learned the fundamentals of the Hive database in Flutter. You’ve also examined a small but full-feature app that uses Hive to store data offline. If you’d like to explore more about persisting data and other interesting things in Flutter, take a look at the following articles:
- Flutter & SQLite: CRUD Example
- Flutter and Firestore Database: CRUD example (null safety)
- 4 Ways to Store Data Offline in Flutter
- How to locally save data in Flutter using shared_preferences
- Using Provider for State Management in Flutter
- Using GetX (Get) for State Management in Flutter
You can also check out our Flutter category page or Dart category page for the latest tutorials and examples.


