


This article shows you how to implement an image picker in Flutter by using the image_picker plugin, which is officially developed and published by the Flutter team.
Complete Example
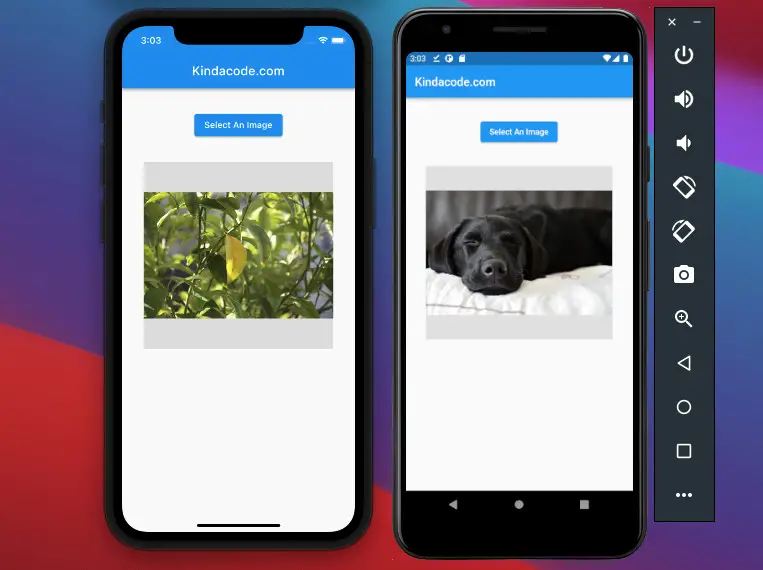
App Preview
We’ll make a simple Flutter app that contains a button. When the user presses that button, an image picker will show up and allow them to pick an image from their device.
Here’s how our app works on iOS and Android:
Note: When the user triggers the image picker for the first time on an iOS device, it will ask for permission, and the user must accept it to continue.
Installing The Plugin
1. Add image_picker and its latest version to the dependencies section in your pubspec.yaml file by running:
flutter pub add image_pickerExecute the following command:
flutter pub get2. Some platform-special setup
If you’re a Windows user and just want to make an app for Android devices, then you can ignore this step and move to the next one.
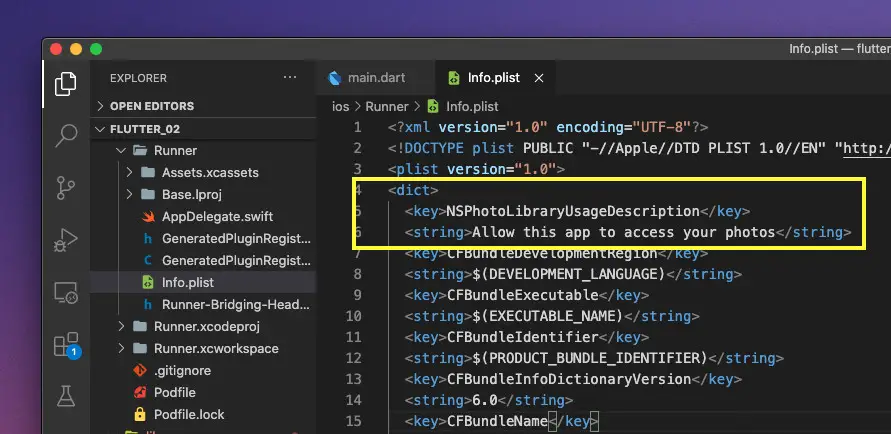
If you’re using a Mac and building an iOS app, you need some extra setup. Go to <your project>/ios/Runner/Info.plist and add the following into the dict section:
<key>NSPhotoLibraryUsageDescription</key>
<string>Allow this app to access your photos</string>
Feel free to replace Allow this app to access your photos with your own message.
My screenshot:
Writing Code
3. Add the following code to your main.dart:
// main.dart
import 'package:flutter/material.dart';
import 'dart:io';
import 'package:image_picker/image_picker.dart';

void main() {
  runApp(const MyApp());
}

class MyApp extends StatelessWidget {
  const MyApp({Key? key}) : super(key: key);

  @override
  Widget build(BuildContext context) {
    return const MaterialApp(
      // Hide the debug banner
      debugShowCheckedModeBanner: false,
      title: 'Kindacode.com',
      home: HomePage(),
    );
  }
}

class HomePage extends StatefulWidget {
  const HomePage({Key? key}) : super(key: key);

  @override
  State<HomePage> createState() => _HomePageState();
}

class _HomePageState extends State<HomePage> {
  // This is the file that will be used to store the image
  File? _image;

  // This is the image picker
  final _picker = ImagePicker();
  // Implementing the image picker
  Future<void> _openImagePicker() async {
    final XFile? pickedImage =
        await _picker.pickImage(source: ImageSource.gallery);
    if (pickedImage != null) {
      setState(() {
        _image = File(pickedImage.path);
      });
    }
  }

  @override
  Widget build(BuildContext context) {
    return Scaffold(
        appBar: AppBar(
          title: const Text('Kindacode.com'),
        ),
        body: SafeArea(
          child: Padding(
            padding: const EdgeInsets.all(35),
            child: Column(children: [
              Center(
                // this button is used to open the image picker
                child: ElevatedButton(
                  onPressed: _openImagePicker,
                  child: const Text('Select An Image'),
                ),
              ),
              const SizedBox(height: 35),
              // The picked image will be displayed here
              Container(
                alignment: Alignment.center,
                width: double.infinity,
                height: 300,
                color: Colors.grey[300],
                child: _image != null
                    ? Image.file(_image!, fit: BoxFit.cover)
                    : const Text('Please select an image'),
              )
            ]),
          ),
        ));
  }
}
4. Launch an iOS simulator or an Android emulator and start your app:
flutter runConclusion
We’ve gone through an end-to-end example of using an image picker. You now have the tools that need to build larger and more complex applications with functions that allow users to upload their photos. If you’d like to explore more new and interesting things about Flutter, take a look at the following articles:
- Flutter + Firebase Storage: Upload, Retrieve, and Delete files
- Flutter image loading builder example
- Flutter: 2 Ways to Create an Onboarding Flow (Intro Slider)
- How to implement a horizontal ListView in Flutter
- 4 Ways to Format DateTime in Flutter
- Viewing PDF files in Flutter
You can also check out our Flutter category page or Dart category page for the latest tutorials and examples.


