


This is a detailed and easy-to-understand guide to working with Flutter and Firebase Storage. We will build an app with common functionality like uploading images, displaying uploaded images from Firebase Storage in a ListView, and deleting some of the uploaded images from right inside the application.
Flutter and Firebase-related packages are updated so often thus I recently updated this article to fix null safety related errors and compatibility issues.
Overview
Prerequisites
To follow along and get the most out of this tutorial, you need the following:
- Basic knowledge about Flutter.
- A registered Firebase account with a ready-to-use project.
- Flutter version 3.7 or newer with Firebase SDK correctly installed. If not, please check this article first: Flutter: Configure Firebase for iOS and Android.
Note that if you use an old version of Flutter (1.x), there may be (a lot of) errors and incompatibilities.
Packages used in the example
Besides firebase_core (which you have to install when adding Firebase SDK), we’ll need the following packages:
- firebase_storage: Provides Firebase Cloud Storage API
- image_picker: Used for picking images from the image library or taking photos with the camera.
- path: A path manipulation library.
The Complete Example
Preview
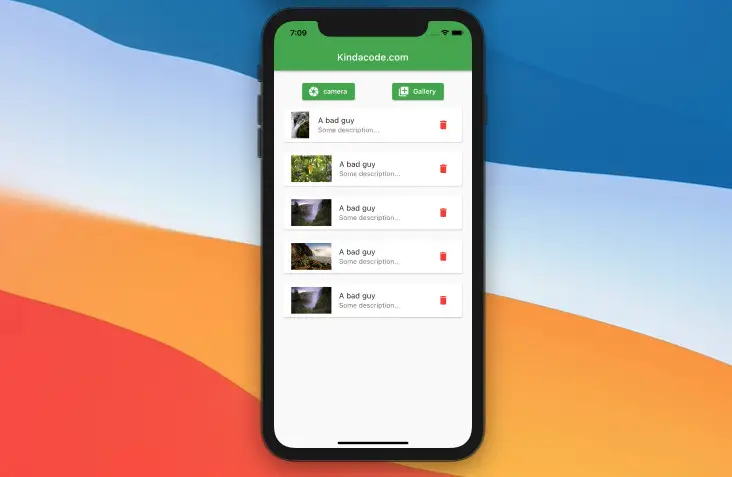
App demo:
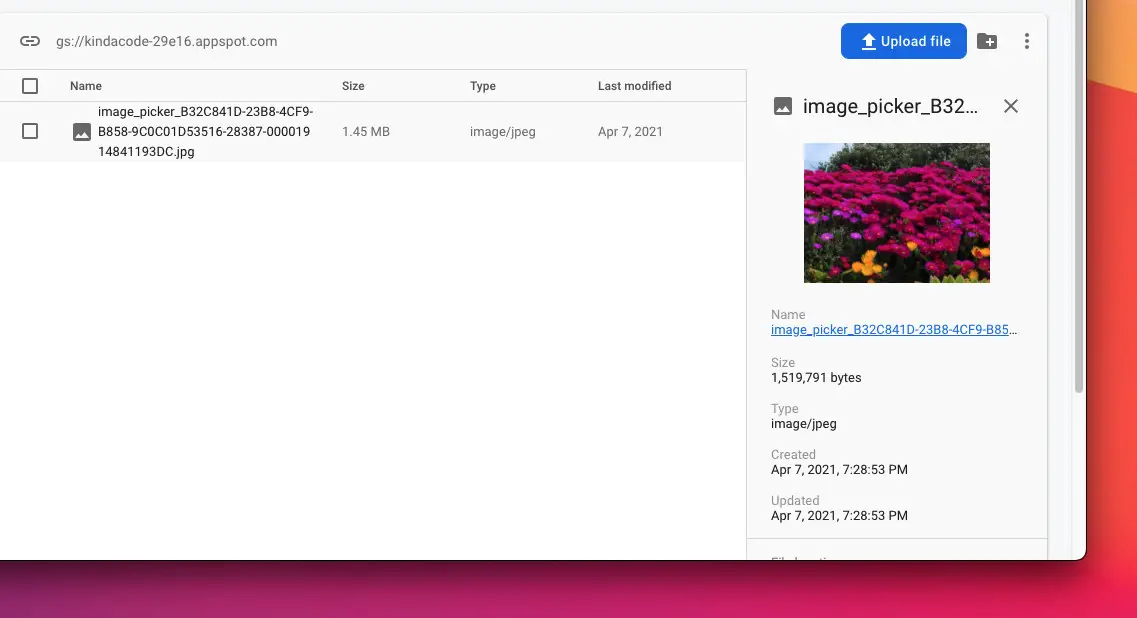
Uploaded images on Firebase Storage:
Note: The iOS simulator doesn’t allow using the camera. If you want this, play with your Android emulator or a real device.
Installing required plugins
Install firebase_storage, image_picker, path_provider, and path by running the following command:
flutter pub add firebase_storage image_picker path_provider pathThen execute this one:
flutter pub getWith the image_picker plugin, we have to do some extra setups for iOS and Android.
iOS
Go to <your-project>/ios/Runner/Info.plist and add the following between <dict> and </dict>:
<key>NSCameraUsageDescription</key>
<string>Some Description</string>
<key>NSMicrophoneUsageDescription</key>
<string>Some Description</string>
<key>NSPhotoLibraryUsageDescription</key>
<string>Some Description</string>
If you are not familiar with this stuff, have a look at my screenshot:
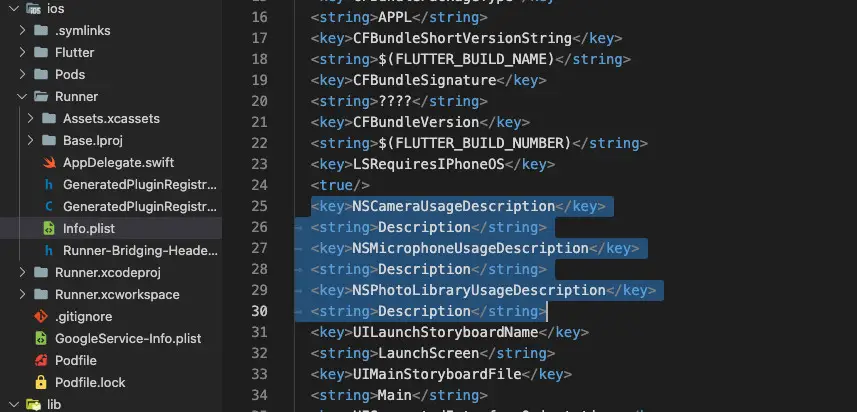
Actually, we don’t need the microphone permission but adding it won’t cause any harm.
Android
- API< 29: No action required.
- API 29+: Add android:requestLegacyExternalStorage=”true” as an attribute to the tag in your AndroidManifest.xml. The attribute is false by default on apps targeting Android Q.
Getting Firebase Storage Ready
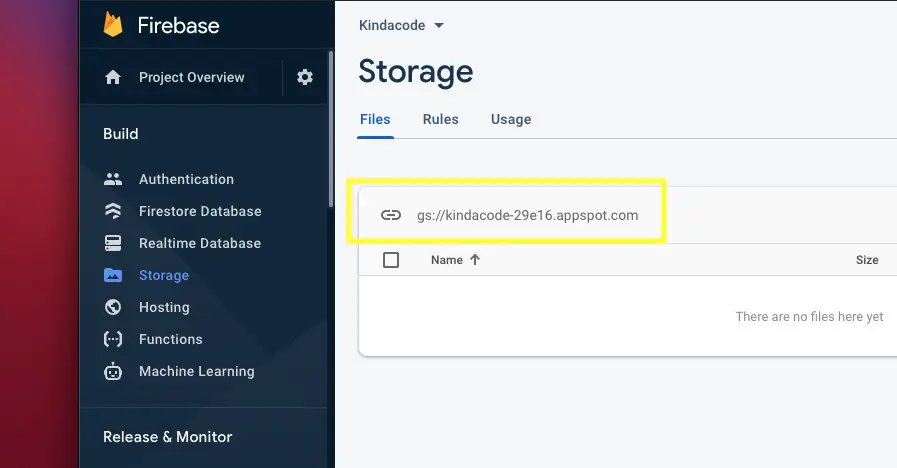
Go to your project dashboard on Firebase Console, select “Storage” from the left-hand menu then you can see the bucket path as shown in the screenshot below:
You don’t have to manually add the path to your Flutter code because it will be handled automatically by Firebase packages.
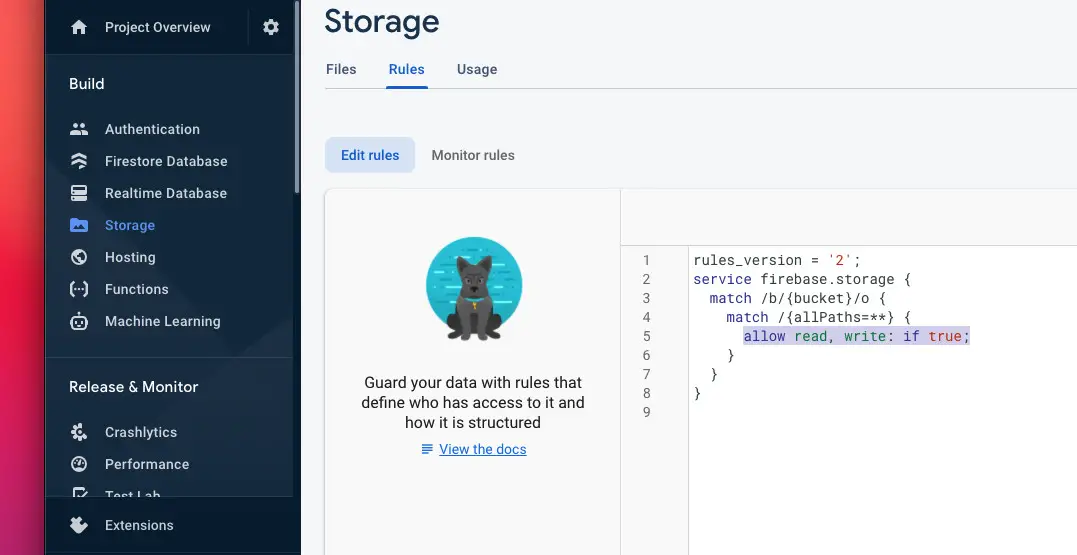
For simplicity’s sake, we will NOT implement authentication in this example. Therefore, we need to change the rules for Firebase Storage to be public, like this:
Now everything is ready, and the job is writing code.
The full code
The code with explanations:
// main.dart
import 'package:flutter/foundation.dart';
import 'package:flutter/material.dart';
import 'dart:io';
import 'package:firebase_core/firebase_core.dart';
import 'package:firebase_storage/firebase_storage.dart';
import 'package:path/path.dart' as path;
import 'package:image_picker/image_picker.dart';

void main() async {
  WidgetsFlutterBinding.ensureInitialized();

  // Initialize a new Firebase App instance
  await Firebase.initializeApp();
  runApp(const MyApp());
}

class MyApp extends StatelessWidget {
  const MyApp({Key? key}) : super(key: key);

  @override
  Widget build(BuildContext context) {
    return MaterialApp(
      // Remove the debug banner
      debugShowCheckedModeBanner: false,
      title: 'Kindacode.com',
      theme: ThemeData(primarySwatch: Colors.green),
      home: const HomePage(),
    );
  }
}

class HomePage extends StatefulWidget {
  const HomePage({Key? key}) : super(key: key);

  @override
  State<HomePage> createState() => _HomePageState();
}

class _HomePageState extends State<HomePage> {
  FirebaseStorage storage = FirebaseStorage.instance;

  // Select and image from the gallery or take a picture with the camera
  // Then upload to Firebase Storage
  Future<void> _upload(String inputSource) async {
    final picker = ImagePicker();
    XFile? pickedImage;
    try {
      pickedImage = await picker.pickImage(
          source: inputSource == 'camera'
              ? ImageSource.camera
              : ImageSource.gallery,
          maxWidth: 1920);

      final String fileName = path.basename(pickedImage!.path);
      File imageFile = File(pickedImage.path);

      try {
        // Uploading the selected image with some custom meta data
        await storage.ref(fileName).putFile(
            imageFile,
            SettableMetadata(customMetadata: {
              'uploaded_by': 'A bad guy',
              'description': 'Some description...'
            }));

        // Refresh the UI
        setState(() {});
      } on FirebaseException catch (error) {
        if (kDebugMode) {
          print(error);
        }
      }
    } catch (err) {
      if (kDebugMode) {
        print(err);
      }
    }
  }

  // Retriew the uploaded images
  // This function is called when the app launches for the first time or when an image is uploaded or deleted
  Future<List<Map<String, dynamic>>> _loadImages() async {
    List<Map<String, dynamic>> files = [];

    final ListResult result = await storage.ref().list();
    final List<Reference> allFiles = result.items;

    await Future.forEach<Reference>(allFiles, (file) async {
      final String fileUrl = await file.getDownloadURL();
      final FullMetadata fileMeta = await file.getMetadata();
      files.add({
        "url": fileUrl,
        "path": file.fullPath,
        "uploaded_by": fileMeta.customMetadata?['uploaded_by'] ?? 'Nobody',
        "description":
            fileMeta.customMetadata?['description'] ?? 'No description'
      });
    });

    return files;
  }

  // Delete the selected image
  // This function is called when a trash icon is pressed
  Future<void> _delete(String ref) async {
    await storage.ref(ref).delete();
    // Rebuild the UI
    setState(() {});
  }

  @override
  Widget build(BuildContext context) {
    return Scaffold(
      appBar: AppBar(
        title: const Text('Kindacode.com'),
      ),
      body: Padding(
        padding: const EdgeInsets.all(20),
        child: Column(
          children: [
            Row(
              mainAxisAlignment: MainAxisAlignment.spaceAround,
              children: [
                ElevatedButton.icon(
                    onPressed: () => _upload('camera'),
                    icon: const Icon(Icons.camera),
                    label: const Text('camera')),
                ElevatedButton.icon(
                    onPressed: () => _upload('gallery'),
                    icon: const Icon(Icons.library_add),
                    label: const Text('Gallery')),
              ],
            ),
            Expanded(
              child: FutureBuilder(
                future: _loadImages(),
                builder: (context,
                    AsyncSnapshot<List<Map<String, dynamic>>> snapshot) {
                  if (snapshot.connectionState == ConnectionState.done) {
                    return ListView.builder(
                      itemCount: snapshot.data?.length ?? 0,
                      itemBuilder: (context, index) {
                        final Map<String, dynamic> image =
                            snapshot.data![index];

                        return Card(
                          margin: const EdgeInsets.symmetric(vertical: 10),
                          child: ListTile(
                            dense: false,
                            leading: Image.network(image['url']),
                            title: Text(image['uploaded_by']),
                            subtitle: Text(image['description']),
                            trailing: IconButton(
                              onPressed: () => _delete(image['path']),
                              icon: const Icon(
                                Icons.delete,
                                color: Colors.red,
                              ),
                            ),
                          ),
                        );
                      },
                    );
                  }

                  return const Center(
                    child: CircularProgressIndicator(),
                  );
                },
              ),
            ),
          ],
        ),
      ),
    );
  }
}Note: The app is intended to be as simple as possible so the code is shorter and cleaner. It has only one screen and uses a stateful widget for state management. It also lacks many production features such as image preview before upload, authentication, authorization, and UI/UX optimization. You can improve these things on your own to get a better result.
Conclusion
Together we’ve built a Flutter application that works with Firebase Storage in uploading, retrieving, and deleting files. A lot of code was written, and it’s totally fine if you don’t absorb them all in one hour or two. The most important thing is that we’ve got the job done, we’ve made something complete, at least on a very small piece of Flutter and Firebase. Doing a lot of practice will help you master that knowledge and quickly deploy them in your future projects.
If you’d like to explore more awesome stuff about Flutter, take a look at the following articles:
- Flutter and Firestore Database: CRUD example
- Working with Time Picker in Flutter
- Flutter StreamBuilder examples
- Flutter: Check Internet Connection without any plugins
- Flutter: Caching Network Images for Big Performance Gains
- Flutter Web: How to Pick and Display an Image
You can also check out our Flutter topic page or Dart topic page for the latest tutorials and examples.


