


This article walks you through a couple of different ways to create beautiful, professional chat bubbles in Flutter. In the first approach, we will write code from scratch and only use built-in stuff of Flutter like CustomPainter, Transform, etc. In the second approach, we will take advantage of a third-party library to get the job done quickly.
A Brief Overview
Nowadays, chat feature appears in many kinds of apps, from messaging apps to e-commerce platforms, from education apps to social networks. In general, speech bubbles often have the following basic characteristics:
- Outgoing messages are on the right side
- Incoming messages are on the left side
- Usually have a small triangle (like an arrowhead)
- The corners are usually rounded
- The background color of incoming and outgoing messages will be different, and different from the background color of the app for easy identification
Creating chat bubbles from scratch
Example preview
We will create two reusable bubble widgets: one for sent messages and the other for received messages.

The code
1. Create a custom triangle:
// Create a custom triangle
class Triangle extends CustomPainter {
  final Color backgroundColor;
  Triangle(this.backgroundColor);

  @override
  void paint(Canvas canvas, Size size) {
    var paint = Paint()..color = backgroundColor;

    var path = Path();
    path.lineTo(-5, 0);
    path.lineTo(0, 10);
    path.lineTo(5, 0);
    canvas.drawPath(path, paint);
  }

  @override
  bool shouldRepaint(CustomPainter oldDelegate) {
    return false;
  }
}
2. Sent message bubble:
// Sent message bubble
class OutBubble extends StatelessWidget {
  final String message;
  const OutBubble({Key? key, required this.message}) : super(key: key);

  @override
  Widget build(BuildContext context) {
    return Row(
      mainAxisAlignment: MainAxisAlignment.end,
      crossAxisAlignment: CrossAxisAlignment.start,
      children: [
        Flexible(
          child: Container(
            padding: const EdgeInsets.all(15),
            margin: const EdgeInsets.only(bottom: 5),
            decoration: BoxDecoration(
              color: Colors.indigo.shade600,
              borderRadius: const BorderRadius.only(
                topLeft: Radius.circular(19),
                bottomLeft: Radius.circular(19),
                bottomRight: Radius.circular(19),
              ),
            ),
            child: Text(
              message,
              style: const TextStyle(color: Colors.white, fontSize: 15),
            ),
          ),
        ),
        CustomPaint(painter: Triangle(Colors.indigo.shade600)),
      ],
    );
  }
}
3. Received message bubble:
//  Received message bubble
class InBubble extends StatelessWidget {
  final String message;
  const InBubble({Key? key, required this.message}) : super(key: key);

  @override
  Widget build(BuildContext context) {
    return Row(
      mainAxisAlignment: MainAxisAlignment.start,
      crossAxisAlignment: CrossAxisAlignment.start,
      children: [
        Transform(
          alignment: Alignment.center,
          transform: Matrix4.rotationY(math.pi),
          child: CustomPaint(
            painter: Triangle(Colors.grey.shade300),
          ),
        ),
        Flexible(
          child: Container(
            padding: const EdgeInsets.all(15),
            margin: const EdgeInsets.only(bottom: 5),
            decoration: BoxDecoration(
              color: Colors.grey.shade300,
              borderRadius: const BorderRadius.only(
                topRight: Radius.circular(19),
                bottomLeft: Radius.circular(19),
                bottomRight: Radius.circular(19),
              ),
            ),
            child: Text(
              message,
              style: const TextStyle(color: Colors.black, fontSize: 15),
            ),
          ),
        ),
      ],
    );
  }
}
4. Display multiple message bubbles by using a list view:
ListView(
            children: const [
              InBubble(message: 'Hello'),
              OutBubble(message: 'Hi there'),
              OutBubble(message: 'How it going?'),
              InBubble(message: 'Everything is OK'),
              OutBubble(message: 'Goodbye'),
              InBubble(message: 'See you soon')
            ],
          ),
5. The complete code (I put everything in a single file but you should organize each class in a separate file):
// main.dart
import 'package:flutter/material.dart';
import 'dart:math' as math;

void main() {
  runApp(const MyApp());
}

class MyApp extends StatelessWidget {
  const MyApp({Key? key}) : super(key: key);

  @override
  Widget build(BuildContext context) {
    return MaterialApp(
      debugShowCheckedModeBanner: false,
      title: 'KindaCode.com',
      theme: ThemeData(
        primarySwatch: Colors.indigo,
      ),
      home: const HomePage(),
    );
  }
}

class HomePage extends StatefulWidget {
  const HomePage({Key? key}) : super(key: key);

  @override
  State<HomePage> createState() => _HomePageState();
}

class _HomePageState extends State<HomePage> {
  @override
  Widget build(BuildContext context) {
    return Scaffold(
        appBar: AppBar(
          title: const Text('Chat with KindaCode.com'),
        ),
        body: Padding(
          padding: const EdgeInsets.all(10),
          child: ListView(
            children: const [
              InBubble(message: 'Hello'),
              OutBubble(message: 'Hi there'),
              OutBubble(message: 'How it going?'),
              InBubble(message: 'Everything is OK'),
              OutBubble(message: 'Goodbye'),
              InBubble(message: 'See you soon')
            ],
          ),
        ));
  }
}

//  Received message bubble
class InBubble extends StatelessWidget {
  final String message;
  const InBubble({Key? key, required this.message}) : super(key: key);

  @override
  Widget build(BuildContext context) {
    return Row(
      mainAxisAlignment: MainAxisAlignment.start,
      crossAxisAlignment: CrossAxisAlignment.start,
      children: [
        Transform(
          alignment: Alignment.center,
          transform: Matrix4.rotationY(math.pi),
          child: CustomPaint(
            painter: Triangle(Colors.grey.shade300),
          ),
        ),
        Flexible(
          child: Container(
            padding: const EdgeInsets.all(15),
            margin: const EdgeInsets.only(bottom: 5),
            decoration: BoxDecoration(
              color: Colors.grey.shade300,
              borderRadius: const BorderRadius.only(
                topRight: Radius.circular(19),
                bottomLeft: Radius.circular(19),
                bottomRight: Radius.circular(19),
              ),
            ),
            child: Text(
              message,
              style: const TextStyle(color: Colors.black, fontSize: 15),
            ),
          ),
        ),
      ],
    );
  }
}

// Sent message bubble
class OutBubble extends StatelessWidget {
  final String message;
  const OutBubble({Key? key, required this.message}) : super(key: key);

  @override
  Widget build(BuildContext context) {
    return Row(
      mainAxisAlignment: MainAxisAlignment.end,
      crossAxisAlignment: CrossAxisAlignment.start,
      children: [
        Flexible(
          child: Container(
            padding: const EdgeInsets.all(15),
            margin: const EdgeInsets.only(bottom: 5),
            decoration: BoxDecoration(
              color: Colors.indigo.shade600,
              borderRadius: const BorderRadius.only(
                topLeft: Radius.circular(19),
                bottomLeft: Radius.circular(19),
                bottomRight: Radius.circular(19),
              ),
            ),
            child: Text(
              message,
              style: const TextStyle(color: Colors.white, fontSize: 15),
            ),
          ),
        ),
        CustomPaint(painter: Triangle(Colors.indigo.shade600)),
      ],
    );
  }
}

// Create a custom triangle
class Triangle extends CustomPainter {
  final Color backgroundColor;
  Triangle(this.backgroundColor);

  @override
  void paint(Canvas canvas, Size size) {
    var paint = Paint()..color = backgroundColor;

    var path = Path();
    path.lineTo(-5, 0);
    path.lineTo(0, 10);
    path.lineTo(5, 0);
    canvas.drawPath(path, paint);
  }

  @override
  bool shouldRepaint(CustomPainter oldDelegate) {
    return false;
  }
}
Using a 3rd plugin
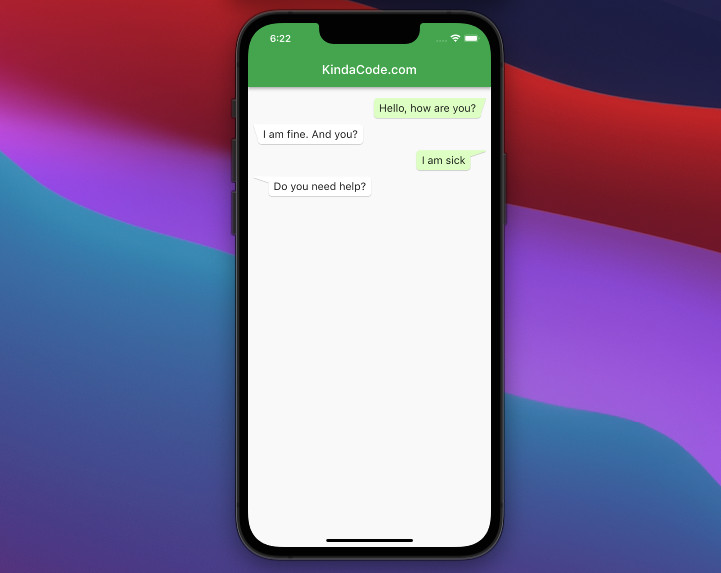
There are many good open-source packages that provide premade speech bubble widgets: bubble, chat_bubble, flutter_chat_bubble, etc. The example below will use the bubble package which provides a lot of options so that you can implement almost every chat style you want.
Example preview
The code
1. Installing the plugin by executing this command:
flutter pub add bubbleThen run:
flutter pub get2. Full source code in main.dart:
// main.dart
import 'package:flutter/material.dart';
import 'package:bubble/bubble.dart';

void main() {
  runApp(const MyApp());
}

class MyApp extends StatelessWidget {
  const MyApp({Key? key}) : super(key: key);

  @override
  Widget build(BuildContext context) {
    return MaterialApp(
      debugShowCheckedModeBanner: false,
      title: 'KindaCode.com',
      theme: ThemeData(
        primarySwatch: Colors.green,
      ),
      home: const HomePage(),
    );
  }
}

class HomePage extends StatelessWidget {
  const HomePage({Key? key}) : super(key: key);
  @override
  Widget build(BuildContext context) {
    return Scaffold(
      appBar: AppBar(
        title: const Text('KindaCode.com'),
      ),
      body: Padding(
        padding: const EdgeInsets.all(8.0),
        child: ListView(
          children: [
            Bubble(
              margin: const BubbleEdges.only(top: 10),
              alignment: Alignment.topRight,
              nipWidth: 8,
              nipHeight: 24,
              nip: BubbleNip.rightTop,
              color: const Color.fromRGBO(225, 255, 199, 1.0),
              child: const Text('Hello, how are you?',
                  textAlign: TextAlign.right, style: TextStyle(fontSize: 17)),
            ),
            Bubble(
              margin: const BubbleEdges.only(top: 10),
              alignment: Alignment.topLeft,
              nipWidth: 8,
              nipHeight: 24,
              nip: BubbleNip.leftTop,
              child: const Text(
                'I am fine. And you?',
                style: TextStyle(fontSize: 17),
              ),
            ),
            Bubble(
              margin: const BubbleEdges.only(top: 10),
              alignment: Alignment.topRight,
              nipWidth: 30,
              nipHeight: 10,
              nip: BubbleNip.rightTop,
              color: const Color.fromRGBO(225, 255, 199, 1.0),
              child: const Text('I am sick',
                  textAlign: TextAlign.right, style: TextStyle(fontSize: 17)),
            ),
            Bubble(
              margin: const BubbleEdges.only(top: 10),
              alignment: Alignment.topLeft,
              nipWidth: 30,
              nipHeight: 10,
              nip: BubbleNip.leftTop,
              child: const Text('Do you need help?',
                  style: TextStyle(fontSize: 17)),
            ),
          ],
        ),
      ),
    );
  }
}
Conclusion
This article showed you two distinct ways to implement chat bubbles. In the first example, we made things from scratch and only used the built-in features of Flutter (especially the CustomPainter class). In the second example, we got what we want quickly by using a third-party plugin.
Flutter is awesome, beautiful, and interesting. If you’d like to explore new stuff about this SDK, take a look at the following articles:
- Flutter: How to Draw a Heart with CustomPaint
- Flutter: Creating OTP/PIN Input Fields (2 approaches)
- Flutter: Drawing an N-Pointed Star with CustomClipper
- Flutter: Drawing Polygons using ClipPath (4 Examples)
- Flutter Transform examples – Making fancy effects
- 2 Ways to Create Flipping Card Animation in Flutter
- Using GetX (Get) for Navigation and Routing in Flutter
You can also take a tour around our Flutter topic page and Dart topic page to see the latest tutorials and examples.


