


In this tutorial, we’ll build a small Flutter project that contains a ListView to show some fiction products. When the user swipes an item from the list, they can remove it.
Overview
Which widgets we will use?
- Dismissible (we’ll focus on this)
- Container, ListView
- ListTile, Icon, Card, CircleAvatar
The Dismissible widget
Constructor:
Dismissible({
  required Key key,
  required Widget child,
  Widget? background,
  Widget? secondaryBackground,
  ConfirmDismissCallback? confirmDismiss,
  VoidCallback? onResize,
  DismissUpdateCallback? onUpdate,
  DismissDirectionCallback? onDismissed,
  DismissDirection direction = DismissDirection.horizontal,
  Duration? resizeDuration = const Duration(milliseconds: 300),
  Map<DismissDirection, double> dismissThresholds = const <DismissDirection, double>{},
  Duration movementDuration = const Duration(milliseconds: 200),
  double crossAxisEndOffset = 0.0,
  DragStartBehavior dragStartBehavior = DragStartBehavior.start,
  HitTestBehavior behavior = HitTestBehavior.opaque
})
Important properties:
- key: You can set it by using UniqueKey() or ValueKey()
- direction: The direction in which the widget can be dismissed
- child: The widget below this widget in the tree
- background: A widget that is stacked behind the child
- onDismissed: Call a function when the widget has been dismissed.
You can see all other properties in the official docs.
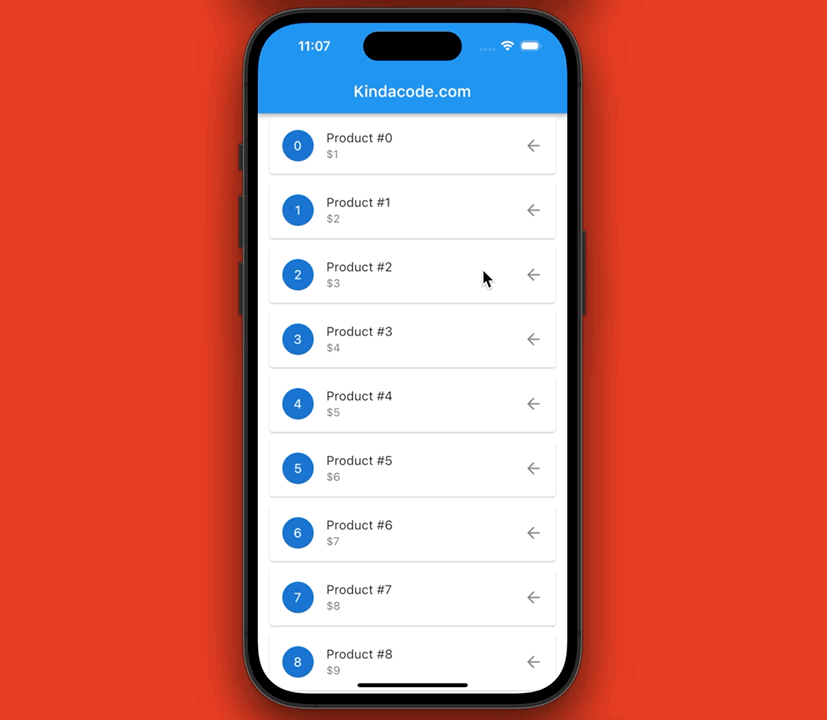
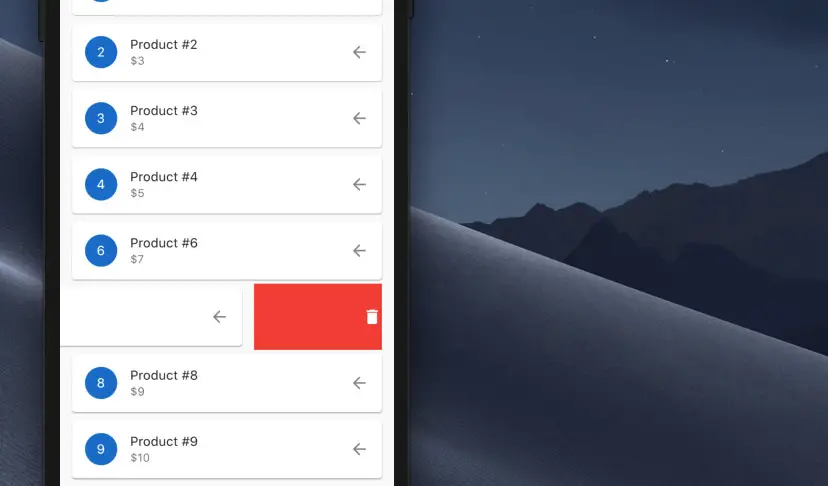
Example Preview
Here’s how our app works at the end:
Getting Started
If you just want to see the final code, then skip this section and jump to the next one.
1. Create a new Flutter project:
flutter create my_app 2. Remove all the default code in main.dart and add the following “skeleton” code:
import 'package:flutter/material.dart';

void main() {
  runApp(const MyApp());
}

class MyApp extends StatelessWidget {
  const MyApp({Key? key}) : super(key: key);

  @override
  Widget build(BuildContext context) {
    return MaterialApp(
      // Hide the debug banner
      debugShowCheckedModeBanner: false,
      title: 'Kindacode.com',
      theme: ThemeData.light(),
      home: const HomePage(),
    );
  }
}

class HomePage extends StatefulWidget {
  const HomePage({Key? key}) : super(key: key);

  @override
  State<HomePage> createState() => _HomePageState();
}

class _HomePageState extends State<HomePage> {
  // Dummy Product Data Here

  @override
  Widget build(BuildContext context) {
    return Scaffold(
        appBar: AppBar(
          title: const Text('Kindacode.com'),
        ),
        body: Container() // The ListView will be here later
    );
  }
}
3. Generate dummy data by using the List.generate() method. Add this snippet below the comment “// Dummy Product Data Here” in the “skeleton” code:
// Dummy Product Data Here
  List myProducts = List.generate(100, (index) {
    return {"id": index, "title": "Product #$index", "price": index};
  });
4. Now, we deal with the most important part of this tutorial: the ListView and its dismissible items. Replace the Container widget with ListView.builder:
ListView.builder(
          itemCount: myProducts.length,
          itemBuilder: (BuildContext ctx, index) {
            // Display the list item
            return Dismissible(
              key: UniqueKey(),

              // only allows the user swipe from right to left
              direction: DismissDirection.endToStart,

              // Remove this product from the list
              // In production enviroment, you may want to send some request to delete it on server side
              onDismissed: (_) {
                setState(() {
                  myProducts.removeAt(index);
                });
              },

              // This will show up when the user performs dismissal action
              // It is a red background and a trash icon
              background: Container(
                color: Colors.red,
                margin: const EdgeInsets.symmetric(horizontal: 15),
                alignment: Alignment.centerRight,
                child: const Icon(
                  Icons.delete,
                  color: Colors.white,
                ),
              ),

              // Display item's title, price...
              child: Card(
                margin: const EdgeInsets.symmetric(horizontal: 15, vertical: 5),
                child: ListTile(
                  leading: CircleAvatar(
                    child: Text(myProducts[index]["id"].toString()),
                  ),
                  title: Text(myProducts[index]["title"]),
                  subtitle: Text("\$${myProducts[index]["price"].toString()}"),
                  trailing: const Icon(Icons.arrow_back),
                ),
              ),
            );
          },
)
5. We’re done with main.dart. Launch an iOS simulator or an Android emulator and run our project:
flutter runCheck your work. Make sure you didn’t make any typos 🙂
The Final Code
The complete source code in main.dart with explanations:
import 'package:flutter/material.dart';

void main() {
  runApp(const MyApp());
}

class MyApp extends StatelessWidget {
  const MyApp({Key? key}) : super(key: key);

  @override
  Widget build(BuildContext context) {
    return MaterialApp(
      // Hide the debug banner
      debugShowCheckedModeBanner: false,
      title: 'Kindacode.com',
      theme: ThemeData.light(),
      home: const HomePage(),
    );
  }
}

class HomePage extends StatefulWidget {
  const HomePage({Key? key}) : super(key: key);

  @override
  State<HomePage> createState() => _HomePageState();
}

class _HomePageState extends State<HomePage> {
  // Dummy Product Data Here
  final List myProducts = List.generate(100, (index) {
    return {"id": index, "title": "Product #$index", "price": index + 1};
  });

  @override
  Widget build(BuildContext context) {
    return Scaffold(
        appBar: AppBar(
          title: const Text('Kindacode.com'),
        ),
        body: ListView.builder(
          itemCount: myProducts.length,
          itemBuilder: (BuildContext ctx, index) {
            // Display the list item
            return Dismissible(
              key: UniqueKey(),

              // only allows the user swipe from right to left
              direction: DismissDirection.endToStart,

              // Remove this product from the list
              // In production enviroment, you may want to send some request to delete it on server side
              onDismissed: (_) {
                setState(() {
                  myProducts.removeAt(index);
                });
              },

              // This will show up when the user performs dismissal action
              // It is a red background and a trash icon
              background: Container(
                color: Colors.red,
                margin: const EdgeInsets.symmetric(horizontal: 15),
                alignment: Alignment.centerRight,
                child: const Icon(
                  Icons.delete,
                  color: Colors.white,
                ),
              ),

              // Display item's title, price...
              child: Card(
                margin: const EdgeInsets.symmetric(horizontal: 15, vertical: 5),
                child: ListTile(
                  leading: CircleAvatar(
                    child: Text(myProducts[index]["id"].toString()),
                  ),
                  title: Text(myProducts[index]["title"]),
                  subtitle: Text("\$${myProducts[index]["price"].toString()}"),
                  trailing: const Icon(Icons.arrow_back),
                ),
              ),
            );
          },
        ));
  }
}
Afterword
We’ve built a sample app that makes use of the Dismissible widget to remove items from a ListView with the swipe gesture. If you’d like to explore more awesome widgets and other interesting stuff in Flutter, take a look at the following articles:
- Flutter: SliverGrid example
- Create a Custom NumPad (Number Keyboard) in Flutter
- Flutter: GridPaper example
- Best Libraries for Making HTTP Requests in Flutter
- Creating Masonry Layout in Flutter with Staggered Grid View
- Using BlockSemantics in Flutter: Tutorial & Example
You can also check out our Flutter category page or Dart category page for the latest tutorials and examples.


