


Flutter offers a lot of built-in widgets that can help us make gorgeous applications without writing too much code or installing too many third-party libraries just for building user interfaces.
In this article, we will take a look at the Stack and IndexedStack widgets and go over some examples of using them in practice.
Table of Contents
Overview
Both Stack and IndexedStack can take a list of widgets as their children. The difference is that Stack can display its children overlap each other while IndexedStack shows only one of its children at a time.
- Stack positions its children relative to the edges of its box. The stack sizes itself to contain all the non-positioned children.
- IndexedStack displays the child which is given index. The size of IndexedStack depends on the size of the largest child.
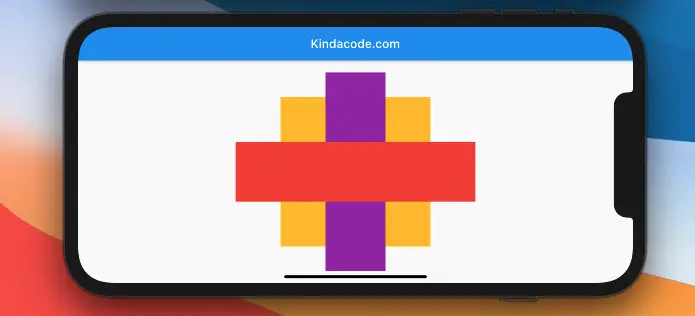
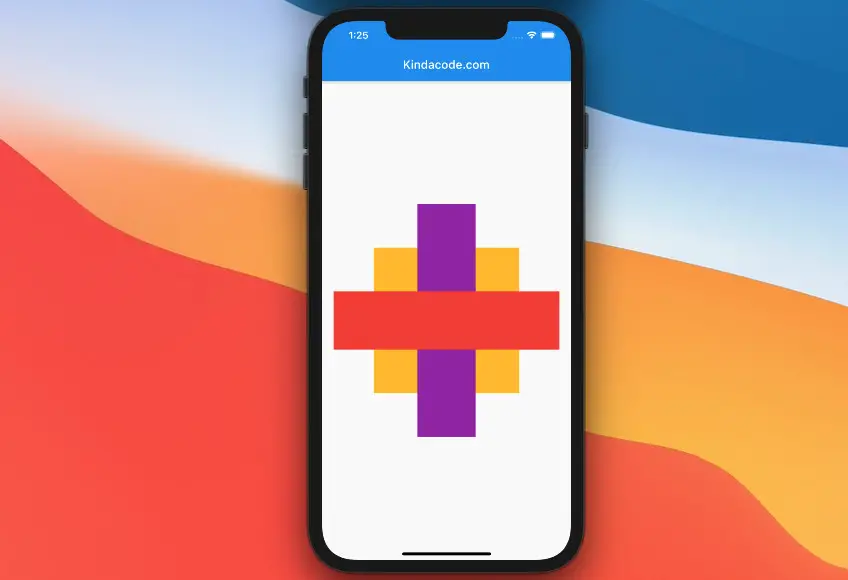
Stack example
Screenshot:
The full code:
import 'package:flutter/material.dart';
void main() {
runApp(const MyApp());
}
class MyApp extends StatelessWidget {
const MyApp({Key? key}) : super(key: key);
@override
Widget build(BuildContext context) {
return const MaterialApp(
debugShowCheckedModeBanner: false,
title: 'Kindacode.com',
home: HomePage(),
);
}
}
class HomePage extends StatelessWidget {
const HomePage({Key? key}) : super(key: key);
@override
Widget build(BuildContext context) {
return Scaffold(
appBar: AppBar(title: const Text('Kindacode.com')),
body: Padding(
padding: const EdgeInsets.all(20),
child: Center(
// The stack here
child: Stack(
alignment: AlignmentDirectional.center,
children: [
Container(
width: 250,
height: 250,
color: Colors.amber,
),
Container(
width: 100,
height: 400,
color: Colors.purple,
),
Container(
width: 400,
height: 100,
color: Colors.red,
)
],
),
),
));
}
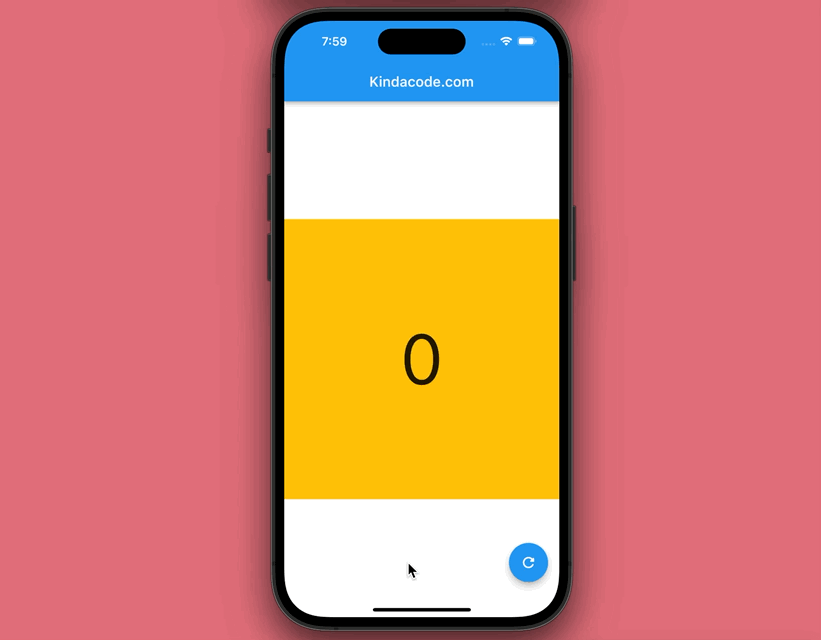
}IndexedStack example
This sample app contains three boxes with three different colors. It also has a floating button. When the user press this button, the current box will disappear, and another will show up.
Preview:
The complete code:
import 'package:flutter/material.dart';

void main() {
  runApp(const MyApp());
}

class MyApp extends StatelessWidget {
  const MyApp({Key? key}) : super(key: key);

  @override
  Widget build(BuildContext context) {
    return const MaterialApp(
      debugShowCheckedModeBanner: false,
      title: 'Kindacode.com',
      home: HomePage(),
    );
  }
}

class HomePage extends StatefulWidget {
  const HomePage({Key? key}) : super(key: key);

  @override
  State<HomePage> createState() => _HomePageState();
}

class _HomePageState extends State<HomePage> {
  int index = 0;
  @override
  Widget build(BuildContext context) {
    return Scaffold(
      appBar: AppBar(title: const Text('Kindacode.com')),
      body: Center(
        child: IndexedStack(
          index: index,
          children: [
            // Index = 0
            Container(
              width: 400,
              height: 400,
              color: Colors.amber,
              alignment: Alignment.center,
              child: const Text(
                '0',
                style: TextStyle(fontSize: 100),
              ),
            ),
            // Index = 1
            Container(
              width: 400,
              height: 400,
              color: Colors.purple,
              alignment: Alignment.center,
              child: const Text('1', style: TextStyle(fontSize: 100)),
            ),
            // Index = 2
            Container(
              width: 400,
              height: 400,
              color: Colors.red,
              alignment: Alignment.center,
              child: const Text('2', style: TextStyle(fontSize: 100)),
            )
          ],
        ),
      ),
      floatingActionButton: FloatingActionButton(
        child: const Icon(Icons.refresh_rounded),
        onPressed: () {
          setState(() {
            if (index == 2) {
              index = 0;
            } else {
              index = index + 1;
            }
          });
        },
      ),
    );
  }
}
API
Stack
Constructor:
Stack({
  Key? key,
  AlignmentGeometry alignment = AlignmentDirectional.topStart,
  TextDirection? textDirection,
  StackFit fit = StackFit.loose,
  lip clipBehavior = Clip.hardEdge,
  List<Widget> children = const <Widget>[]
})
Common properties:
| Property | Type | Description |
|---|---|---|
| children | List<Widget> | The children widgets |
| alignment | AlignmentGeometry | Aligns the non-positioned and partially-positioned children |
| fit | StackFit | (StackFit.loose, StackFit.expand, StackFit.passthrough) Controls the constraints of non-positioned children |
| clipBehavior | Clip | Determines whether the content will be clipped or not |
IndexedStack
Constructor:
IndexedStack({
  Key? key,
  AlignmentGeometry alignment = AlignmentDirectional.topStart,
  TextDirection? textDirection,
  StackFit sizing = StackFit.loose,
  int? index = 0,
  List<Widget> children = const <Widget>[]
})
Common properties:
| Property | Type | Description |
|---|---|---|
| index | int | The index of the child that is displayed |
| children | List<Widget> | The children widgets |
Wrap Up
We have learned about the Stack and IndexedStack widgets and walked through a few examples of using them in applications. To continue learning more interesting stuff about Flutter, you can read some of the following articles:
- Flutter ConstrainedBox
- How to implement Star Rating in Flutter
- Guide to InteractiveViewer in Flutter
- Flutter FadeTransition example
- How to make an image carousel in Flutter
You can also take a tour around our Flutter topic page and Dart topic page to see the latest tutorials and examples.


