


This article walks you through a few practical examples of using the FilteringTextInputFormatter widget in Flutter to blacklist or whitelist certain characters when the user enters text into a TextField (or TextFormField). Without any further ado, let’s dive into the code.
Example 1: Only Allowing Alphabet Letters
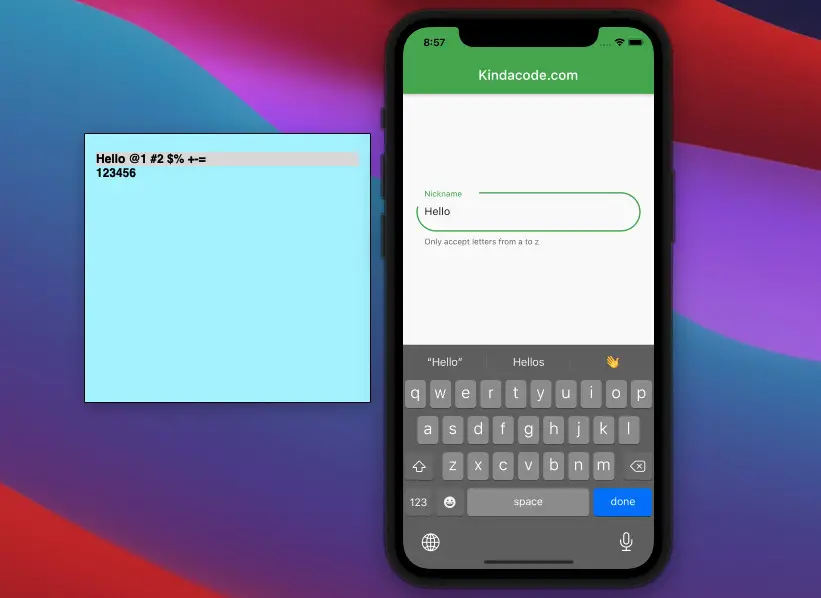
Preview
Let’s say we have a text field that lets the user enter his or her nickname. Only letters in the alphabet are allowed (both lowercase and uppercase). No numbers, symbols, or emojis are accepted, regardless of whether they are entered from the keyboard or copied/pasted from somewhere else.
The code
Here’s the complete code that produces the app shown in the demo above:
// main.dart
import 'package:flutter/material.dart';
import 'package:flutter/services.dart';

void main() {
  runApp(const MyApp());
}

class MyApp extends StatelessWidget {
  const MyApp({Key? key}) : super(key: key);

  @override
  Widget build(BuildContext context) {
    return MaterialApp(
        // Remove the debug banner
        debugShowCheckedModeBanner: false,
        title: 'Kindacode.com',
        theme: ThemeData(
          primarySwatch: Colors.green,
        ),
        home: const HomePage());
  }
}

class HomePage extends StatefulWidget {
  const HomePage({Key? key}) : super(key: key);

  @override
  State<HomePage> createState() => _HomePageState();
}

class _HomePageState extends State<HomePage> {
  @override
  Widget build(BuildContext context) {
    return Scaffold(
      appBar: AppBar(
        title: const Text('Kindacode.com'),
      ),
      body: Center(
        child: Padding(
          padding: const EdgeInsets.all(20),
          child: TextField(
            inputFormatters: [
              // only accept letters from a to z
              FilteringTextInputFormatter(RegExp(r'[a-zA-Z]'), allow: true)
            ],
            decoration: InputDecoration(
                labelText: 'Nickname',
                helperText: 'Only accept letters from a to z',
                border: OutlineInputBorder(
                    borderRadius: BorderRadius.circular(50))),
          ),
        ),
      ),
    );
  }
}
Example 2: Preventing Offensive Words from Being Displayed
In this example, we’ll use the FilteringTextInputFormatter.deny constructor to blacklist some words.
Preview
Let’s say we have a social app where users can make comments. Because we don’t want toxic people to say offensive words on our platform, we’ll define a list of banned words. When a user types a word that exists in the blacklist, it will be replaced with “***”.
In the demo, we’ll prevent only 3 words: “fool”, “donkey”, “idiot” from being displayed. However, you can add as many words as you want.
The Code
// main.dart
import 'package:flutter/material.dart';
import 'package:flutter/services.dart';

void main() {
  runApp(const MyApp());
}

class MyApp extends StatelessWidget {
  const MyApp({Key? key}) : super(key: key);

  @override
  Widget build(BuildContext context) {
    return MaterialApp(
        // Remove the debug banner
        debugShowCheckedModeBanner: false,
        title: 'Kindacode.com',
        theme: ThemeData(
          primarySwatch: Colors.amber,
        ),
        home: const HomePage());
  }
}

class HomePage extends StatefulWidget {
  const HomePage({Key? key}) : super(key: key);

  @override
  State<HomePage> createState() => _HomePageState();
}

class _HomePageState extends State<HomePage> {
  @override
  Widget build(BuildContext context) {
    return Scaffold(
      appBar: AppBar(
        title: const Text('Kindacode.com'),
      ),
      body: Center(
        child: Padding(
          padding: const EdgeInsets.all(20),
          child: TextField(
            inputFormatters: [
              // Eveerything is allowed except banned words
              FilteringTextInputFormatter.deny(
                  RegExp(r'(idiot|donkey|fool)', caseSensitive: false),
                  replacementString: '***')
            ],
            decoration: InputDecoration(
                labelText: 'Leave a reply',
                helperText: 'Please be polite and friendly when comment',
                border: OutlineInputBorder(
                    borderRadius: BorderRadius.circular(50))),
          ),
        ),
      ),
    );
  }
}
Conclusion
We’ve gone through 2 examples of implementing FilteringTextInputFormatter in an app. You can find more information about that class on flutter.dev.
If you’d like to explore more new and fascinating stuff about Flutter and Dart, take a look at the following articles:
- Flutter & Dart: Regular Expression Examples
- Flutter form validation example
- Flutter: Show/Hide Password in TextField/TextFormField
- Working with dynamic Checkboxes in Flutter
- Flutter: Caching Network Images for Big Performance gains
- How to Subtract two Dates in Flutter & Dart
You can also take a tour around our Flutter topic page and Dart topic page to see the latest tutorials and examples.


