


If your Flutter app has multiple screens then when you navigate from screen A to screen B, a default back button will be automatically added to the app bar of screen B. This back button has the shape of an arrow pointing to the left and has no text. There might be cases where you want to create a custom back button, for example, a back button with both text and an icon like this:
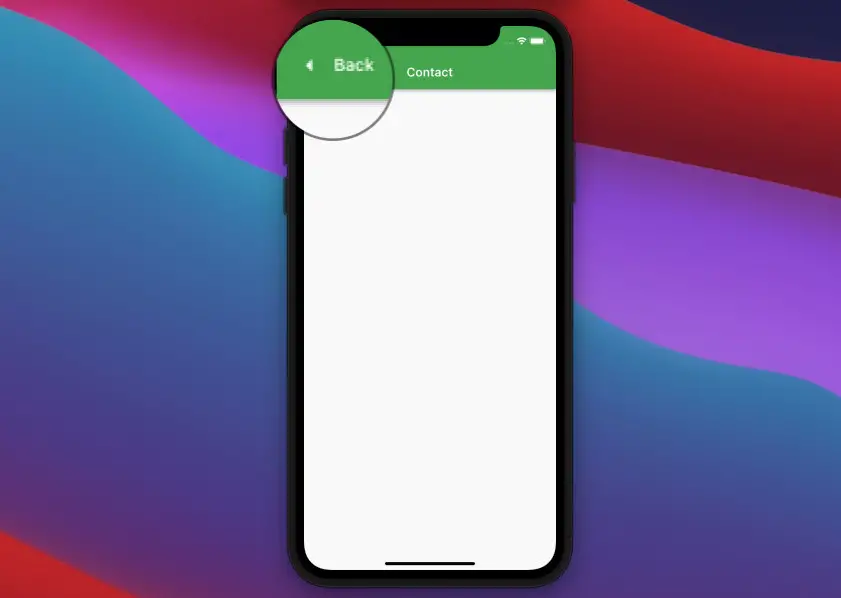
Table of Contents
TL;DR
The solution is quite simple. What you need to do is to set the leading argument of the AppBar widget to your custom widget (eg: an elevated button):
 AppBar(
        // Overide the default Back button
        automaticallyImplyLeading: false,
        leadingWidth: 100,
        leading: ElevatedButton.icon(
          onPressed: () => Navigator.of(context).pop(),
          icon: const Icon(Icons.arrow_left_sharp),
          label: const Text('Back'),
          style: ElevatedButton.styleFrom(
            elevation: 0,
            backgroundColor: Colors.transparent,
          ),
        ),

        // other stuff
        title: const Text('Contact'),
),
For more clarity, see the example below.
The Complete Example
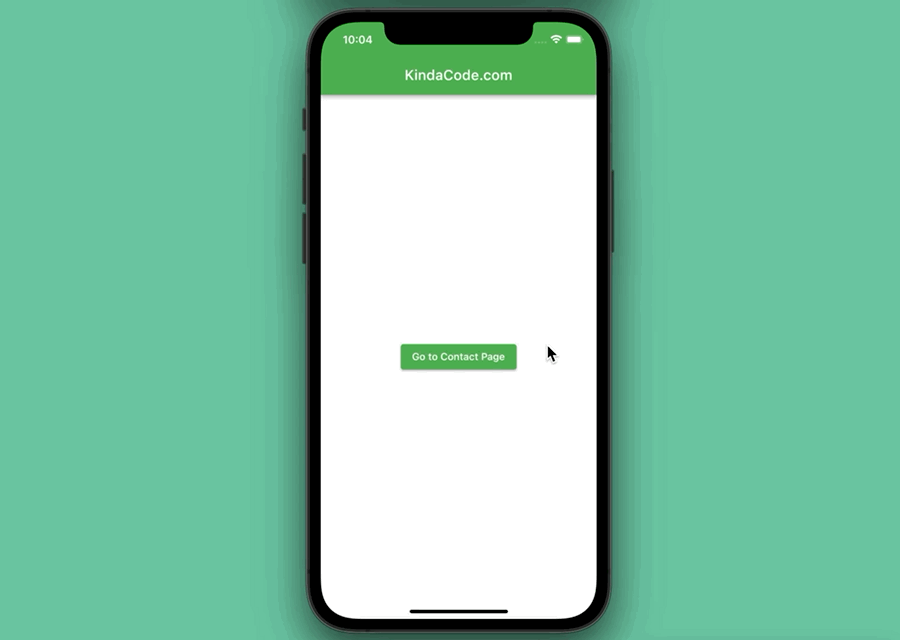
App Preview
The app we are going to build contains 2 screens (aka pages): HomePage and ContactPage. You can use the button in the center of the HomePage to go to the ContactPage. Here you will see the custom back button and can use it to go back:
The Final Code
The complete source code that produces the demo app above:
// main.dart
import 'package:flutter/material.dart';

void main() {
  runApp(const MyApp());
}

class MyApp extends StatelessWidget {
  const MyApp({Key? key}) : super(key: key);

  @override
  Widget build(BuildContext context) {
    return MaterialApp(
      debugShowCheckedModeBanner: false,
      title: 'KindaCode.com',
      theme: ThemeData(
        primarySwatch: Colors.green,
      ),
      home: const HomePage(),
    );
  }
}

// Home Page
class HomePage extends StatelessWidget {
  const HomePage({Key? key}) : super(key: key);
  @override
  Widget build(BuildContext context) {
    return Scaffold(
      appBar: AppBar(
        title: const Text('KindaCode.com'),
      ),
      body: Center(
        child: ElevatedButton(
          onPressed: () {
            Navigator.of(context).push(
                MaterialPageRoute(builder: (context) => const ContactPage()));
          },
          child: const Text('Go to Contact Page'),
        ),
      ),
    );
  }
}

// Contact Page
class ContactPage extends StatelessWidget {
  const ContactPage({Key? key}) : super(key: key);

  @override
  Widget build(BuildContext context) {
    return Scaffold(
      appBar: AppBar(
        // Overide the default Back button
        automaticallyImplyLeading: false,
        leadingWidth: 100,
        leading: ElevatedButton.icon(
          onPressed: () => Navigator.of(context).pop(),
          icon: const Icon(Icons.arrow_left_sharp),
          label: const Text('Back'),
          style: ElevatedButton.styleFrom(
            elevation: 0,
            backgroundColor: Colors.transparent,
          ),
        ),

        // other stuff
        title: const Text('Contact'),
      ),
    );
  }
}
Wrapping Up
You’ve learned how to override the default back button in Flutter. If you’d like to explore more new and exciting stuff about the awesome SDK, take a look at the following articles:
- Flutter: Creating an Auto-Resize TextField
- Flutter: Text with Read More / Read Less Buttons
- Using IntrinsicWidth in Flutter: Example & Explanation
- Flutter: Creating Strikethrough Text (Cross Out Text)
- Flutter & Hive Database: CRUD Example
- Flutter & SQLite: CRUD Example
- Using Provider for State Management in Flutter
You can also take a tour around our Flutter topic page and Dart topic page to see the latest tutorials and examples.


