


This tutorial walks you through a practical example of creating an image carousel (or slideshow) with Tailwind CSS and a little vanilla Javascript (only a few lines). No more rambling, let’s get started.
Table of Contents
Example Preview
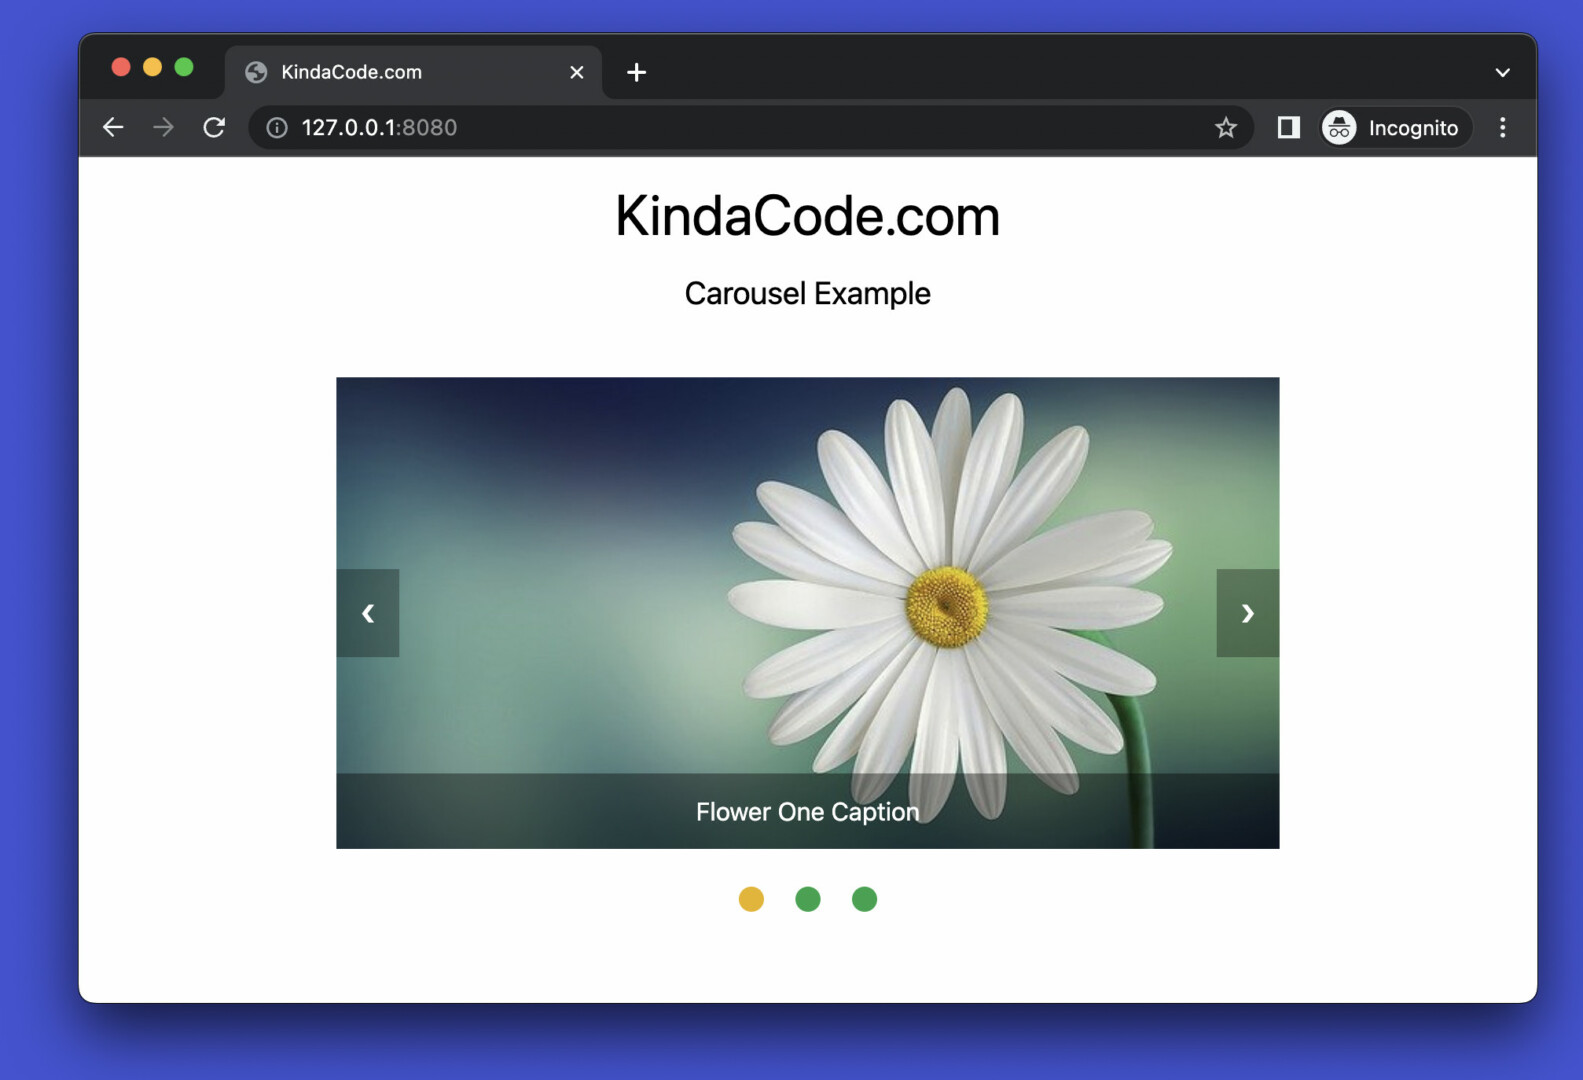
The GIF below depicts what we’re going to build. It’s a simple webpage whose main part is a simple image carousel. This carousel has a previous button (the left arrow) and a next button (the right arrow) those can be used to move to the previous and the next slide, respectively. You can also use a dot at the bottom to quickly jump to the corresponding slide.
Each slide has an image and a caption. To make the text captions easy to read, we add a transparent high-contrast background around each.
Here’s how it works:

The Code
Below is the full source code with explanations in the comments:
<!doctype html>
<html>

<head>
    <meta charset="UTF-8">
    <meta name="viewport" content="width=device-width, initial-scale=1.0">
    <meta http-equiv="X-UA-Compatible" content="ie=edge">
    <script src="https://cdn.tailwindcss.com"></script>
    <title>KindaCode.com</title>
</head>

<body>
    <h1 class="my-4 text-center text-4xl">KindaCode.com</h1>
    <h2 class="mb-10 text-center text-xl">Carousel Example</h2>

    <!-- Implement the carousel -->
    <div class="relative w-[600px] mx-auto">
        <div class="slide relative">
            <img class="w-full h-[300px] object-cover"
                src="https://www.kindacode.com/wp-content/uploads/2022/07/flower-1.jpeg">
            <div class="absolute bottom-0 w-full px-5 py-3 bg-black/40 text-center text-white">Flower One Caption</div>
        </div>

        <div class="slide relative">
            <img class="w-full h-[300px] object-cover"
                src="https://www.kindacode.com/wp-content/uploads/2022/07/flower-2.jpeg">
            <div class="absolute bottom-0 w-full px-5 py-3 bg-black/40 text-center text-white">Flower Two Caption</div>
        </div>

        <div class="slide relative">
            <img class="w-full h-[300px] object-cover"
                src="https://www.kindacode.com/wp-content/uploads/2022/07/flower-3.jpeg">
            <div class="absolute bottom-0 w-full px-5 py-3 bg-black/40 text-center text-white">Flower Three Caption
            </div>
        </div>

        <!-- The previous button -->
        <a class="absolute left-0 top-1/2 p-4 -translate-y-1/2 bg-black/30 hover:bg-black/50 text-white hover:text-amber-500 cursor-pointer"
            onclick="moveSlide(-1)">❮</a>

        <!-- The next button -->
        <a class="absolute right-0 top-1/2 p-4 -translate-y-1/2 bg-black/30 hover:bg-black/50 text-white hover:text-amber-500 cursor-pointer"
            onclick="moveSlide(1)">❯</a>

    </div>
    <br>

    <!-- The dots -->
    <div class="flex justify-center items-center space-x-5">
        <div class="dot w-4 h-4 rounded-full cursor-pointer" onclick="currentSlide(1)"></div>
        <div class="dot w-4 h-4 rounded-full cursor-pointer" onclick="currentSlide(2)"></div>
        <div class="dot w-4 h-4 rounded-full cursor-pointer" onclick="currentSlide(3)"></div>
    </div>

    <!-- Javascript code -->
    <script>
        // set the default active slide to the first one
        let slideIndex = 1;
        showSlide(slideIndex);

        // change slide with the prev/next button
        function moveSlide(moveStep) {
            showSlide(slideIndex += moveStep);
        }

        // change slide with the dots
        function currentSlide(n) {
            showSlide(slideIndex = n);
        }

        function showSlide(n) {
            let i;
            const slides = document.getElementsByClassName("slide");
            const dots = document.getElementsByClassName('dot');

            if (n > slides.length) { slideIndex = 1 }
            if (n < 1) { slideIndex = slides.length }

            // hide all slides
            for (i = 0; i < slides.length; i++) {
                slides[i].classList.add('hidden');
            }

            // remove active status from all dots
            for (i = 0; i < dots.length; i++) {
                dots[i].classList.remove('bg-yellow-500');
                dots[i].classList.add('bg-green-600');
            }

            // show the active slide
            slides[slideIndex - 1].classList.remove('hidden');

            // highlight the active dot
            dots[slideIndex - 1].classList.remove('bg-green-600');
            dots[slideIndex - 1].classList.add('bg-yellow-500');
        }
    </script>
</body>

</html>Note: Images in the preceding examples are from Pixabay, used for tutorial purposes, under the Pixabay License.
Conclusion
You’ve examined a complete example of implementing a minimal image carousel with Tailwind CSS and pure Javascript. From this point, you can improve the project, adjust the width and height as well as other things to make it fit your needs.
If you’d like to learn more new and interesting stuff about modern web technologies, take a look at the following articles:
- Tailwind CSS: Create a Responsive Navbar with a Search Box
- Tailwind CSS: How to Create an Off-Canvas Side Menu
- Tailwind CSS: Create a Fixed/Sticky Footer Menu
- Text Shadows in Tailwind CSS
- How to Create a Fixed Sidebar with Tailwind CSS
- Using Tailwind CSS with Font Awesome Icons: A Deep Dive
You can also check out our CSS category page for the latest tutorials and examples.