


Tailwind CSS is a popular CSS framework that can help you style your website without leaving your HTML code. Font Awesome is one of the most used icon kits ever. Using them together can improve the performance and work experience of web developers. This article will cover the most important aspects you need to know when doing so. Without any further ado, let’s get started.
Installation
Font Awesome
The most convenient and quickest way to add Font Awesome to your project is CDN. Insert the following to the <head> section of your page:
<link rel="stylesheet" href="https://cdnjs.cloudflare.com/ajax/libs/font-awesome/6.1.1/css/all.min.css" />You can also download host Font Awesome locally or install its NPM package. See all the approaches in Font Awesome’s official docs.
Note: You can find the list of all free icons here.
Tailwind CSS
For learning and development purposes, the upcoming examples in this article will use Tailwind CSS from its CDN. Add the script below to the <head> tag of your HTML file:
<script src="https://cdn.tailwindcss.com"></script>There are many other ways to integrate Tailwind CSS into your website. You can find them in Tailwind’s official docs.
In the following examples, we’ll use this starter HTML:
<!doctype html>
<html>

<head>
    <meta charset="UTF-8">
    <meta name="viewport" content="width=device-width, initial-scale=1.0">
    <meta http-equiv="X-UA-Compatible" content="ie=edge">

    <link rel="stylesheet" href="https://cdnjs.cloudflare.com/ajax/libs/font-awesome/6.1.1/css/all.min.css" />
    <script src="https://cdn.tailwindcss.com"></script>
    <title>KindaCode.com</title>
</head>

<body>
   <!-- examples of this article will be here -->
</body>

</html>
Styling Font Awesome Icons with Tailwind CSS Utility Classes
Size, Color, Opacity, and Rotation
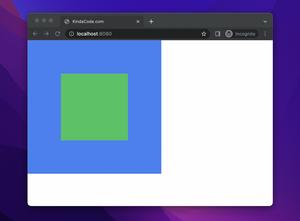
You can control the size and color of an icon by using the text-{size} and text-{color} utility classes, respectively.
You can also set the transparency of an icon using the opacity-{value} utility.
To rotate an icon, use the rotate-{value} utility. For more details, see How to Rotate an Element in Tailwind CSS.
Important note: All classes that start with fa (the two letters that stand for Font Awesome) belong to Font Awesome. Other classes are from Tailwind CSS.
Example:
<body class="p-40 space-x-5 bg-amber-100">
    <i class="fa fa-fan text-7xl text-green-500"></i>
    <i class="fa-solid fa-user text-[99px] text-indigo-600 hover:text-amber-400"></i>
    <i class="fa-solid fa-search text-[11rem] text-rose-600 opacity-60 hover:opacity-100"></i>
</body>
Screenshot:

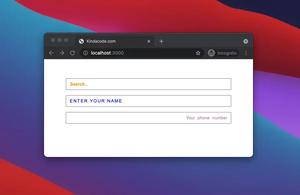
Adding Icons to Form Elements
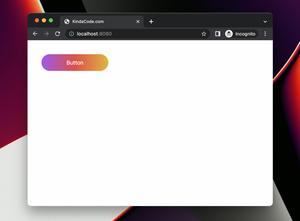
The example below shows you how to use Font Awesome icons with form elements like buttons, text inputs, etc.
Screenshot:
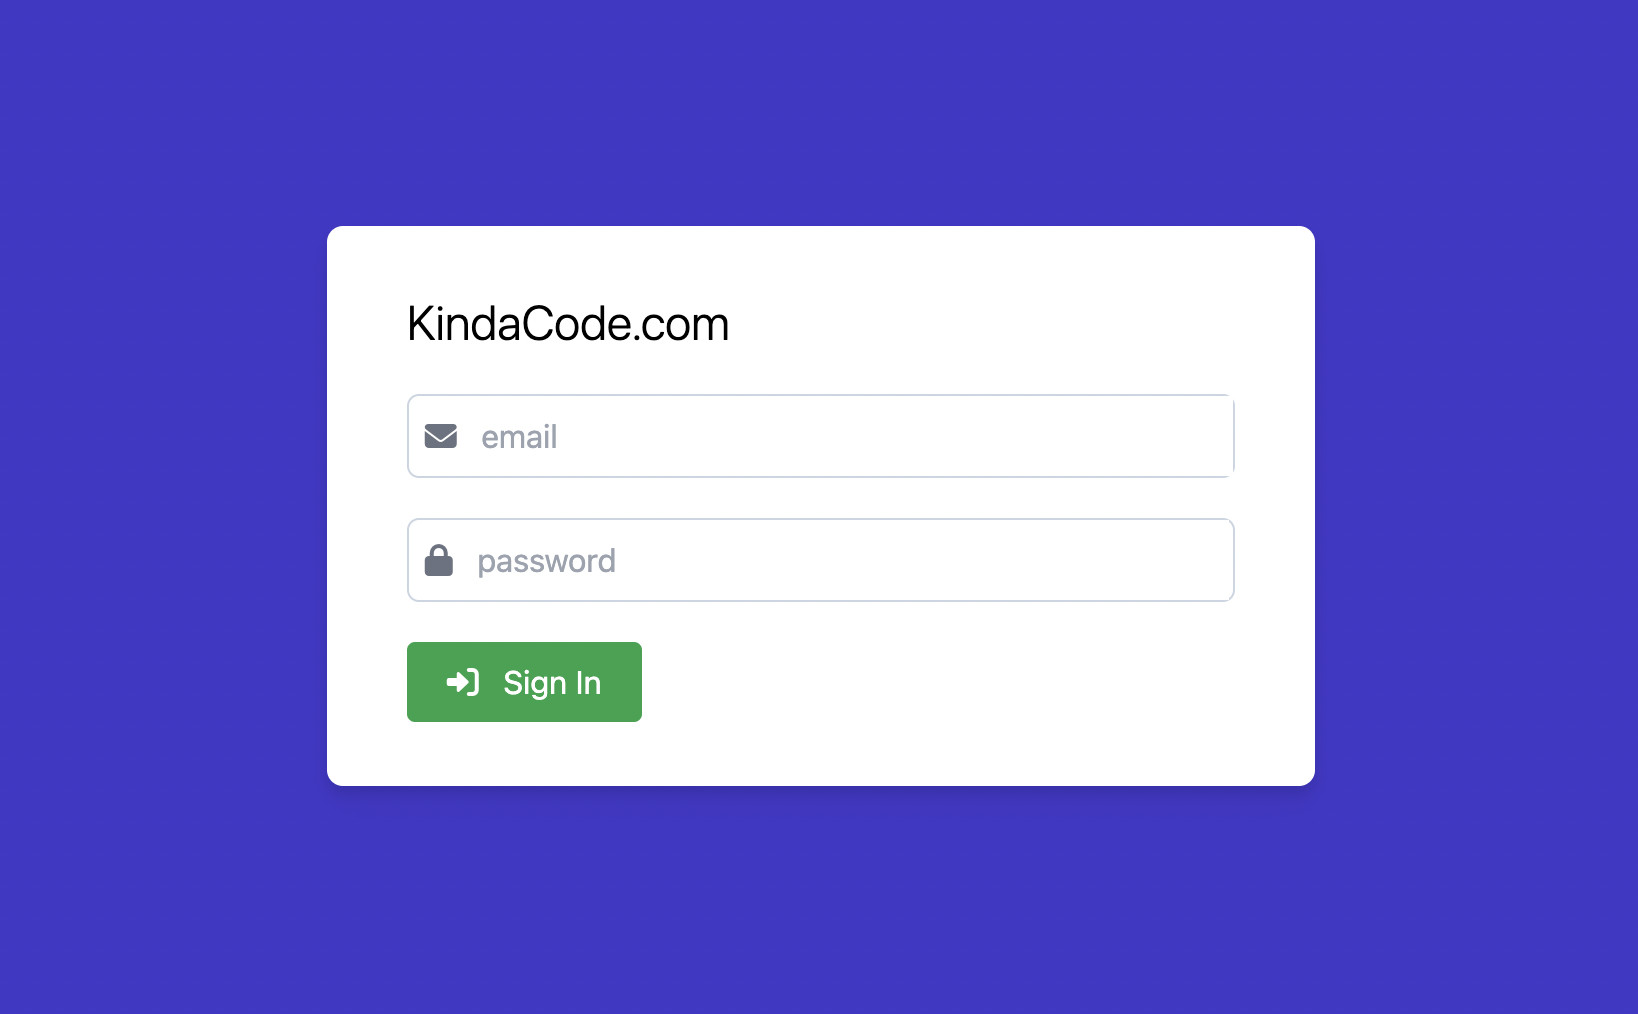
The code:
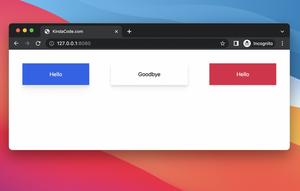
<body class="w-screen h-screen flex justify-center items-center bg-indigo-700">
    <form action="" class="bg-white px-10 py-8 rounded-lg drop-shadow-lg space-y-5">
        <h1 class="text-2xl font-light">KindaCode.com</h1>

        <div class="pl-2 border border-slate-300 rounded-md">
            <label for="email"><i class="fa-solid fa-envelope text-gray-500"></i></label>
            <input type="text" id="email" name="email" placeholder="email"
                class="px-2 py-2 w-96 border-0 focus:outline-0" />
        </div>

        <div class="pl-2 border border-slate-300 rounded-md">
            <label for="email"><i class="fa-solid fa-lock text-gray-500"></i></label>
            <input type="password" id="password" name="password" placeholder="password"
                class="px-2 py-2 w-96 border-0 focus:outline-0" />
        </div>

        <button type="submit" class="px-5 py-2 bg-green-600 hover:bg-green-700 text-white rounded">
            <i class="fa-solid fa-right-to-bracket mr-2"></i>
            Sign In
        </button>
    </form>
</body>
Animating an Icon
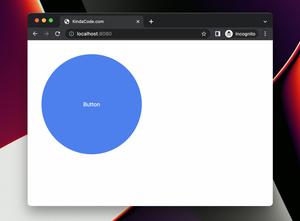
To animate an icon, you have two options:
- Use one of animation utility classes provided by Tailwind CSS: animate-spin, animate-ping, animate-pulse, animate-bounce
- Use one of animation classes provided by Font Awesome: fa-beat, fa-spin, fa-fade, fa-beat-fade, fa-flip, fa-shake.
Example:
<body class="p-40 space-x-5 bg-amber-100">
    <i class="fa-solid fa-fan text-[10rem] text-green-500 animate-spin"></i>
    <i class="fa-solid fa-heart fa-beat text-[150px] text-rose-600"></i>
</body>
Output:
Using Font Awesome Icons in a List
Sample code:
<body class="p-40 space-x-5 bg-amber-100">
    <ul class="fa-ul space-y-2">
        <li>
            <span class="fa-li"><i class="fa-solid fa-bath text-blue-500"></i></span>
            Do You Want to Learn to Code?
        </li>
        <li>
            <span class="fa-li"><i class="fa-solid fa-fire text-orange-500"></i></span>
            Do You Want to Burn Something?
        </li>
        <li>
            <span class="fa-li"><i class="fa-solid fa-brush text-green-500"></i></span>
            Welcome to KindaCode.com
        </li>
        <li>
            <span class="fa-li"><i class="fa-solid fa-heart text-red-500"></i></span>
            Happy Coding!
        </li>
    </ul>
</body>
Screenshot:

Conclusion
You’ve learned how to style Font Awesome icons with Tailwind CSS. Using these two libraries helps us to develop projects much faster than without them. If you’d like to gain more experience and explore more new and fascinating things about modern web technologies, take a look at the following articles:
- Tailwind CSS: Create a Responsive Top Navigation Menu
- How to Create Pill Buttons with Tailwind CSS
- Tailwind CSS: How to Create a Stepper
- How to Style Breadcrumb Navigation with Tailwind CSS
- Tailwind CSS: How to Create a Sticky Social Sharing Bar
- Tailwind CSS: Create an Animated & Closable Side Menu
You can also check out our CSS category page for the latest tutorials and examples.