


This practical walks you through the steps to implement an image carousel (slider) in React. We’ll make it from the ground up without any third-party NPM packages. No more ramble; let’s get our hands dirty.
Prerequisites: Some basic knowledge of React and CSS.
Table of Contents
Overview
An image carousel is a slideshow for cycling through a series of images (maybe with some text). The advantage is that it saves space no matter how many images there are. Only one image is presented at a time. To view another one, the user can use a pair of next/previous buttons or something like that.
In the example to come, we’ll render this array of photos:
const photos = [
  {
    id: 'p1',
    title: 'Photo One',
    url: 'https://www.kindacode.com/wp-content/uploads/2022/08/1.png',
  },
  {
    id: 'p2',
    title: 'Photo Two',
    url: 'https://www.kindacode.com/wp-content/uploads/2022/08/2.png',
  },
  {
    id: 'p3',
    title: 'Photo Three',
    url: 'https://www.kindacode.com/wp-content/uploads/2022/08/3.jpg',
  },
  {
    id: 'p4',
    title: 'Photo Four',
    url: 'https://www.kindacode.com/wp-content/uploads/2022/08/4.jpg',
  },
];
The Example
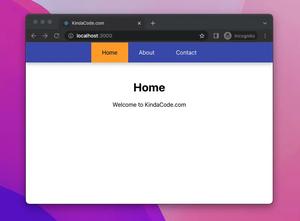
App Preview
The sample we’re going to work with contains a carousel. This carousel displays a list of photos and each photo goes with a text caption.
To move to the next photo, you can use the Next button on the right side. if you are at the end, it will automatically jump to the first photo. To move to the previous photo, you can use the Previous button. if you are at the beginning, it will jump right to the last photo.
There is also a row of dots that indicates which photo is currently active. Furthermore, we add fade animation so the changes are smooth and not abrupt.
Here’s the demo:

To avoid the size of the GIF file being too large, I compressed it. As an inevitable consequence, its quality is not so sharp. That’s the trade-off.
The Code
1. To make sure we have the same starting point, you should initialize a brand new React project:
npx create-react-app kindacode-exampleEven though there are many folders and files generated, we’ll only touch 2 ones: src/App.js and src/App.css.
2. The full source code in App.js (with explanations in the comments):
// KindaCode.com
// src/App.js
import { useState } from 'react';
import './App.css';
// this array holds the data for the carousel
const photos = [
{
id: 'p1',
title: 'Photo One',
url: 'https://www.kindacode.com/wp-content/uploads/2022/08/1.png',
},
{
id: 'p2',
title: 'Photo Two',
url: 'https://www.kindacode.com/wp-content/uploads/2022/08/2.png',
},
{
id: 'p3',
title: 'Photo Three',
url: 'https://www.kindacode.com/wp-content/uploads/2022/08/3.jpg',
},
{
id: 'p4',
title: 'Photo Four',
url: 'https://www.kindacode.com/wp-content/uploads/2022/08/4.jpg',
},
];
function App() {
// show the photo with this index
const [currentIndex, setCurrentIndex] = useState(0);
// move to the next photo
// if we are at the end, go to the first photo
const next = () => {
setCurrentIndex((currentIndex + 1) % photos.length);
};
// move to the previous photo
// if we are at the beginning, go to the last photo
const prev = () => {
setCurrentIndex((currentIndex - 1 + photos.length) % photos.length);
};
return (
<>
{/* Render the carousel */}
<div className='slider-container'>
{photos.map((photo) => (
<div
key={photo.id}
// if the photo is the current photo, show it
className={
photos[currentIndex].id === photo.id ? 'fade' : 'slide fade'
}
>
<img src={photo.url} alt={photo.title} className='photo' />
<div className='caption'>{photo.title}</div>
</div>
))}
{/* Previous button */}
<button onClick={prev} className='prev'>
<
</button>
{/* Next button */}
<button onClick={next} className='next'>
>
</button>
</div>
{/* Render dots indicator */}
<div className='dots'>
{photos.map((photo) => (
<span
key={photo.id}
// highlight the dot that corresponds to the current photo
className={
photos[currentIndex].id === photo.id ? 'dot active' : 'dot'
}
// when the user clicks on a dot, go to the corresponding photo
onClick={() => setCurrentIndex(photos.indexOf(photo))}
></span>
))}
</div>
</>
);
}
export default App;3. CSS is an indispensable part of this project. Here’s the code for your src/App.css file:
* {
  box-sizing: border-box;
}

/* Slideshow container */
.slider-container {
  position: relative;
  margin: 50px auto 20px auto;
  width: 600px;
  height: 300px;
}

/* Style each slide */
.slide {
  display: none;
  width: 100%;
  height: 100%;
}

.photo {
  width: 100%;
  max-height: 300px;
  object-fit: cover;
}

/* Next & previous buttons */
.prev,
.next {
  cursor: pointer;
  position: absolute;
  top: 50%;
  width: auto;
  padding: 16px;
  margin-top: -22px;
  background: rgba(0, 0, 0, 0.3);
  color: white;
  font-weight: bold;
  font-size: 18px;
  transition: 0.6s ease;
  border: none;
}

/* Position the "next" button to the right */
.next {
  right: 0;
}

/* On hover, add a semi-transparent black background */
.prev:hover,
.next:hover {
  background-color: rgba(0, 0, 0, 0.8);
}

/* Caption text */
.caption {
  position: absolute;
  bottom: 8px;
  width: 100%;
  padding: 8px 12px;
  text-align: center;
  font-size: 15px;
  font-weight: bold;
  color: #fff;
}

/* The dots indicator */
.dots {
  display: flex;
  justify-content: center;
}

.dot {
  cursor: pointer;
  height: 15px;
  width: 15px;
  margin: 0 5px;
  background-color: #ccc;
  border-radius: 50%;
  display: inline-block;
  transition: 0.5s;
}

.active,
.dot:hover {
  background-color: gray;
}

/* Fading animation */
.fade {
  animation-name: fade;
  animation-duration: 1.5s;
}

@keyframes fade {
  from {
    opacity: 0.3;
  }
  to {
    opacity: 1;
  }
}
4. Run the project and go to http://localhost:3000 to check the result.
Conclusion
Congratulations! You made it, an element image carousel. By writing code from scratch, you can deeply understand the mechanism under the hood and attain the freedom to customize the project to your liking and is not dependent on third-party libraries.
Keep your motivation high and continue gaining more experience by taking a look at the following articles:
- React: How to Create a Responsive Navbar from Scratch
- React + TypeScript: Making a Reading Progress Indicator
- React: Show Image Preview before Uploading
- React Router Dom: Implement a Not Found (404) Route
- React: Using inline styles with the calc() function
- React: “I agree to terms” checkbox example
You can also check our React category page and React Native category page for the latest tutorials and examples.