


This article walks you through a complete example of making a password strength checker in React and TypeScript. We will build it from scratch and will NOT use any third-party packages. In addition, we will use modern features of React including hooks (useState, useEffect) and functional components.
Table of Contents
The Example
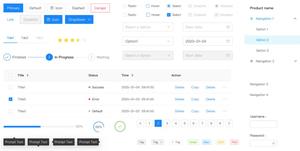
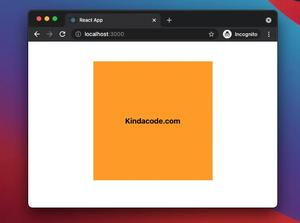
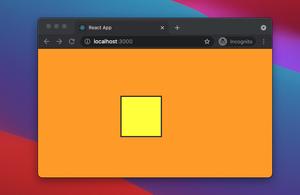
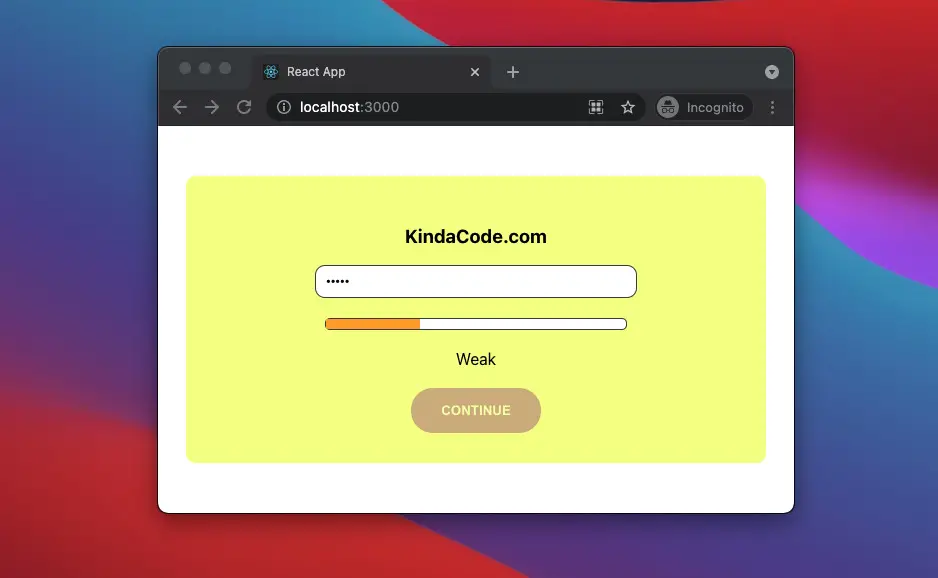
App Preview
The app we are going to contains a password input field, a status bar, a button, and some text. Password has 5 levels: Very Weak, Weak, Medium, Strong, Very Strong. The strength of the password will be shown on the status bar and in the text just below it.
If the password is specified as Weak or Very Weak, the button will be disabled.
Here’s how it works:
The Code
The full source code in src/App.jsx with explanations:
// App.tsx
import React, { useState, useEffect } from "react";

// Declare password strength type
type PasswordStrength =
  | "Very Weak"
  | "Weak"
  | "Medium"
  | "Strong"
  | "Very Strong";

const App = () => {
  // The password
  const [password, setPassword] = useState<string>("");
  const [passwordStrength, setPasswordStrength] =
    useState<PasswordStrength>("Very Weak");
  const [isButtonDisabled, setIsButtonDisabled] = useState<boolean>(true);

  // This function will be triggered when the password input field changes
  const inputHandler = (event: React.ChangeEvent<HTMLInputElement>) => {
    const enteredValue = event.target.value.trim();
    setPassword(enteredValue);
  };

  useEffect(() => {
    if (password.length <= 4) {
      setPasswordStrength("Very Weak");
      setIsButtonDisabled(true);
    } else if (password.length <= 6) {
      setPasswordStrength("Weak");
      setIsButtonDisabled(true);
    } else if (password.length <= 8) {
      setPasswordStrength("Medium");
    } else if (password.length <= 12) {
      setPasswordStrength("Strong");
      setIsButtonDisabled(false);
    } else {
      setPasswordStrength("Very Strong");
      setIsButtonDisabled(false);
    }
  }, [password]);

  // Button handler function
  const buttonHandler = () => {
    alert("You have entered a strong enough password");
    // Do otehr things here
  };

  return (
    <div style={styles.container}>
      <h3>KindaCode.com</h3>

      {/* The input field */}
      <input
        type="password"
        value={password}
        onChange={inputHandler}
        placeholder="Enter you password"
        style={styles.password}
      />

      {/* This bar indicated the strength of the entered password */}
      <div style={styles.statusBar}>
        <div
          style={{
            ...styles.strength,
            width: `${(password.length / 16) * 100}%`,
          }}
        ></div>
      </div>

      {/* Password strength message */}
      <div style={styles.message}>{passwordStrength}</div>

      {/* This button is only clickable when the entered password is strong enough */}
      <button
        style={
          isButtonDisabled
            ? { ...styles.button, ...styles.disabledButton }
            : styles.button
        }
        disabled={isButtonDisabled}
        onClick={buttonHandler}
      >
        CONTINUE
      </button>
    </div>
  );
};

// Styling
const styles = {
  container: {
    width: 400,
    padding: "30px 90px",
    margin: "50px auto",
    backgroundColor: "#f4ff81",
    borderRadius: "10px",
    display: "flex",
    flexDirection: "column",
    alignItems: "center",
  },
  password: {
    width: 300,
    padding: "8px 10px",
    border: "1px solid #444",
    borderRadius: "10px",
    outline: "none",
  },
  statusBar: {
    width: 300,
    height: 10,
    marginTop: 20,
    background: "#fff",
    border: "1px solid #444",
    borderRadius: "5px",
  },
  strength: {
    height: "100%",
    maxWidth: "100%",
    backgroundColor: "orange",
  },
  message: {
    padding: "20px 0",
  },
  button: {
    padding: "15px 30px",
    cursor: "pointer",
    background: "purple",
    color: "#fff",
    fontWeight: "bold",
    border: "none",
    borderRadius: "30px",
  },
  disabledButton: {
    cursor: "not-allowed",
    opacity: 0.3,
  },
} as const;

export default App;
Conclusion
We’ve examined an end-to-end example of building a real-world password strength monitor with TypeScript and React from scratch. You can modify it and add some extra features as needed. If you’d like to learn more about React and frontend development, take a look at the following articles:
- React + TypeScript: Handling onFocus and onBlur events
- React + TypeScript: Drag and Drop Example
- React + TypeScript: Making a Reading Progress Indicator
- React useReducer hook – Tutorial and Examples
- 5 best open-source WYSIWYG editors for React
- Top 4 React form validation libraries
You can also check our React category page and React Native category page for the latest tutorials and examples.