


Tables help us to display information in a clear and concise manner. In this article, we’ll take a look at the Table widget in Flutter and walk through 3 different examples of implementing it in mobile applications. You’ll also learn how to make a Table look much better than default by adding borders and padding, setting columns’ widths, etc.
Constructor
First, let’s check the Table’s constructor:
Table({
  Key? key,
  List<TableRow> children = const <TableRow>[],
  Map<int, TableColumnWidth>? columnWidths,
  TableColumnWidth defaultColumnWidth = const FlexColumnWidth(),
  TextDirection? textDirection,
  TableBorder? border,
  TableCellVerticalAlignment defaultVerticalAlignment = TableCellVerticalAlignment.top,
  TextBaseline? textBaseline
})
Basic example:
Padding(
        padding: const EdgeInsets.all(20),
        child: Table(
          children: const [
            TableRow(children: [Text('id'), Text('email'), Text('name')]),
            TableRow(children: [
              Text('1'),
              Text('[email protected]'),
              Text('Ant-Man')
            ]),
            TableRow(
                children: [Text('2'), Text('[email protected]'), Text('Batman')])
          ],
        ),
      ),
Output:
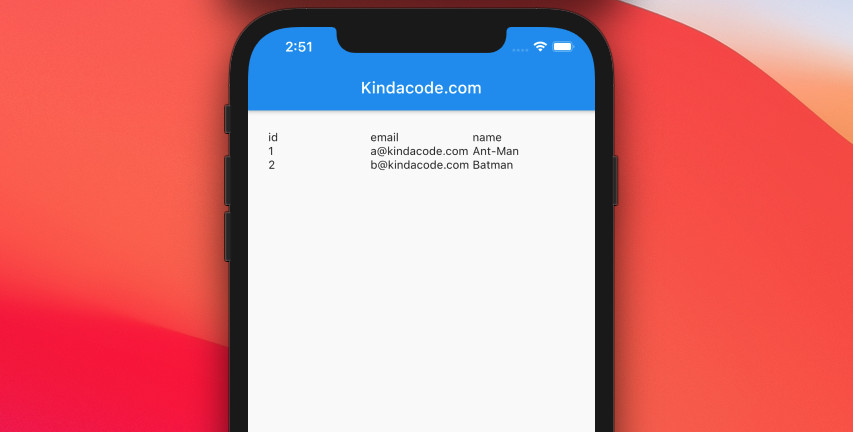
This table doesn’t look very nice. Don’t worry; we’ll improve it later.
Properties
| Property | Type | Description |
|---|---|---|
| children | List<TableRow> | Takes a list of TableTow as a parameter. TableRow, in turn, can take a list of widgets as children |
| border | TableBorder | The style to use when painting the boundary and interior divisions |
| columnWidths | Map<int, TableColumnWidth> | Determines the width of the columns |
| defaultColumnWidth | TableColumnWidth | Divides up the remaining space in the horizontal axis to determine the column width |
| defaultVerticalAlignment | TableCellVerticalAlignment | Sets the alignment of cells vertically in the table |
| textBaseline | TextBaseline | Specifies a horizontal line uses to align text on the screen inside the table |
Styling a Table
Note: In Flutter, tables aren’t scrollable. If it has too many rows, you should wrap it within a SingleChildScrollView.
Rows size vertically based on their contents.
By default, columns of a Table have the same widths. That’s not ideal, as some columns need a little space while others need more space. To set the width for each column in a Table, we can use the columnWidths property like this:
columnWidths: {
   0: FixedColumnWidth(50), // this column has a fixed width of 50
   1: FlexColumnWidth(1), // take 1/3 of the remaining space
   2: FlexColumnWidth(2), // // take 2/3 of the remaining space
},Note: The first column of a table has an index of 0
You can add borders to a Table by using its border property like this:
border: TableBorder.all(width: 1, color: Colors.purple),The contents of the table cells are too close together, and it would be better to add a bit of padding. You can do so by wrapping them inside a Padding or a Container.
Example
Preview:
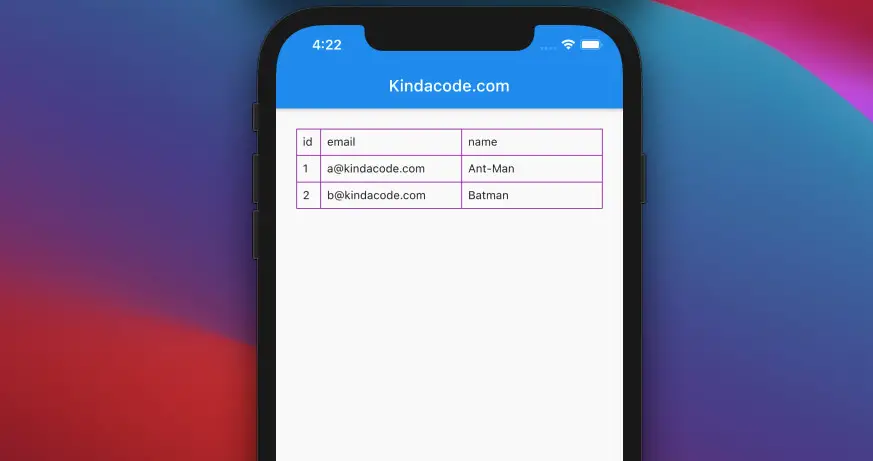
The code:
Scaffold(
appBar: AppBar(
title: const Text('Kindacode.com'),
),
body: Padding(
padding: const EdgeInsets.all(25),
child: Table(
columnWidths: const {
0: FixedColumnWidth(30),
1: FlexColumnWidth(),
2: FlexColumnWidth()
},
children: const [
TableRow(children: [
Padding(
padding: EdgeInsets.all(8.0),
child: Text('id'),
),
Padding(
padding: EdgeInsets.all(8.0),
child: Text('email'),
),
Padding(
padding: EdgeInsets.all(8.0),
child: Text('name'),
)
]),
TableRow(children: [
Padding(
padding: EdgeInsets.all(8.0),
child: Text('1'),
),
Padding(
padding: EdgeInsets.all(8.0),
child: Text('[email protected]'),
),
Padding(
padding: EdgeInsets.all(8.0),
child: Text('Ant-Man'),
)
]),
TableRow(children: [
Padding(
padding: EdgeInsets.all(8.0),
child: Text('2'),
),
Padding(
padding: EdgeInsets.all(8.0),
child: Text('[email protected]'),
),
Padding(
padding: EdgeInsets.all(8.0),
child: Text('Batman'),
)
])
],
border: TableBorder.all(width: 1, color: Colors.purple),
),
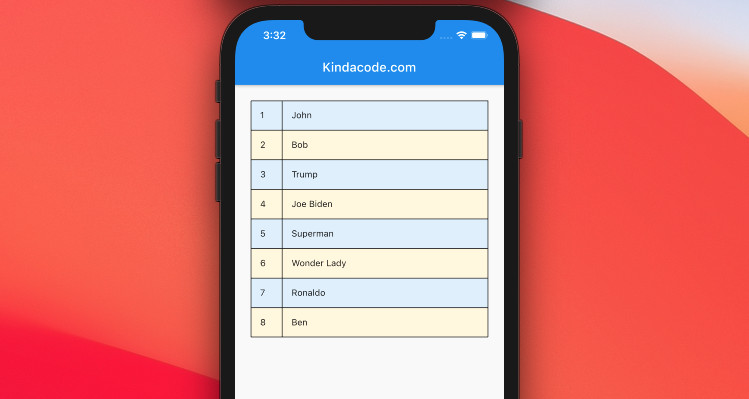
));One More Example: Striped Table
This example creates a table whose even rows will have one background color, and odd rows will have a different background color. This enhances readability and user experience.
Preview:

The complete code:
// main.dart
import 'package:flutter/material.dart';

void main() {
  runApp(const MyApp());
}

class MyApp extends StatelessWidget {
  const MyApp({Key? key}) : super(key: key);

  @override
  Widget build(BuildContext context) {
    return MaterialApp(
      debugShowCheckedModeBanner: false,
      title: 'KindaCode.com',
      theme: ThemeData(
        primarySwatch: Colors.blue,
      ),
      home: MyHomePage(),
    );
  }
}

class MyHomePage extends StatelessWidget {
  // this dummy data will be displayed in the table
  final List<Map> _users = [
    {'id': 1, 'name': 'John'},
    {'id': 2, 'name': 'Bob'},
    {'id': 3, 'name': 'Trump'},
    {'id': 4, 'name': 'Joe Biden'},
    {'id': 5, 'name': 'Superman'},
    {'id': 6, 'name': 'Wonder Lady'},
    {'id': 7, 'name': 'Ronaldo'},
    {'id': 8, 'name': 'Ben'}
  ];

  MyHomePage({Key? key}) : super(key: key);

  @override
  Widget build(BuildContext context) {
    return Scaffold(
        appBar: AppBar(
          title: const Text('Kindacode.com'),
        ),
        body: Padding(
          padding: const EdgeInsets.all(25),
          child: SingleChildScrollView(
            child: Table(
              columnWidths: const {
                0: FixedColumnWidth(50),
                1: FlexColumnWidth(),
              },
              children: _users.map((user) {
                return TableRow(children: [
                  Container(
                      color: _users.indexOf(user) % 2 == 0
                          ? Colors.blue[50]
                          : Colors.amber[50],
                      padding: const EdgeInsets.all(15),
                      child: Text(user['id'].toString())),
                  Container(
                      color: _users.indexOf(user) % 2 == 0
                          ? Colors.blue[50]
                          : Colors.amber[50],
                      padding: const EdgeInsets.all(15),
                      child: Text(user['name']))
                ]);
              }).toList(),
              border: TableBorder.all(width: 1, color: Colors.black),
            ),
          ),
        ));
  }
}
Conclusion
In this article, we explored the built-in table widget in Flutter. It is really helpful in helping us to neatly display information in rows and columns. If you’d like to learn more about other table widgets as well as other new and interesting things in Flutter, take a look at the following articles:
- Example of sortable DataTable in Flutter
- Flutter PaginatedDataTable Example
- Flutter & Hive Database: CRUD Example
- Flutter & SQLite: CRUD Example
- Best Libraries for Making HTTP Requests in Flutter
- Flutter: GridPaper example
If you’d like to learn more about Flutter and Dart, check out our Flutter category page or Dart category page for more tutorials and examples.


