This succinct, practical article shows you how programmatically add/remove CSS classes to/from an element in React. We can get the job done without installing any third-party libraries.
Table of Contents
Overview
You can add/remove single or multiple classes to/from an element with an event handler function or by using the useRef hook.
With an event handler function:
// define the event handler function
const buttonClickHandler = (e) => {
    e.currentTarget.classList.remove('light');
    e.currentTarget.classList.add('dark');
};

// set onClick or other event props on your element
<button onClick={buttonClickHandler}>I AM A BUTTON</button>
With the useRef() hook:
/* Fefine a ref */
const kindaCodeRef = useRef();

/* Tie the ref with a certain element */
<div ref={kindaCodeRef}></div>

/* Add and Remove many classes at once */
kindaCodeRef.current.classList.remove('class-1', 'class-2', 'class-3');
kindaCodeRef.current.classList.add('class-4', 'class-5', 'class-6');
You can also toggle a class name like so:
kindaCodeRef.current.classList.toggle('dark-backgorund');
kindaCodeRef.current.classList.toggle('light-background');
For more clarity, see the complete, working example below.
Example
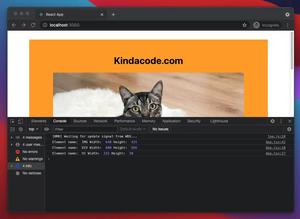
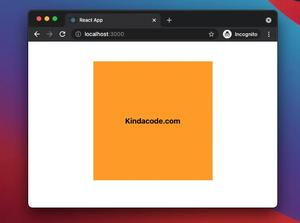
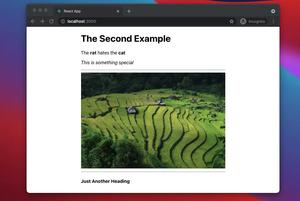
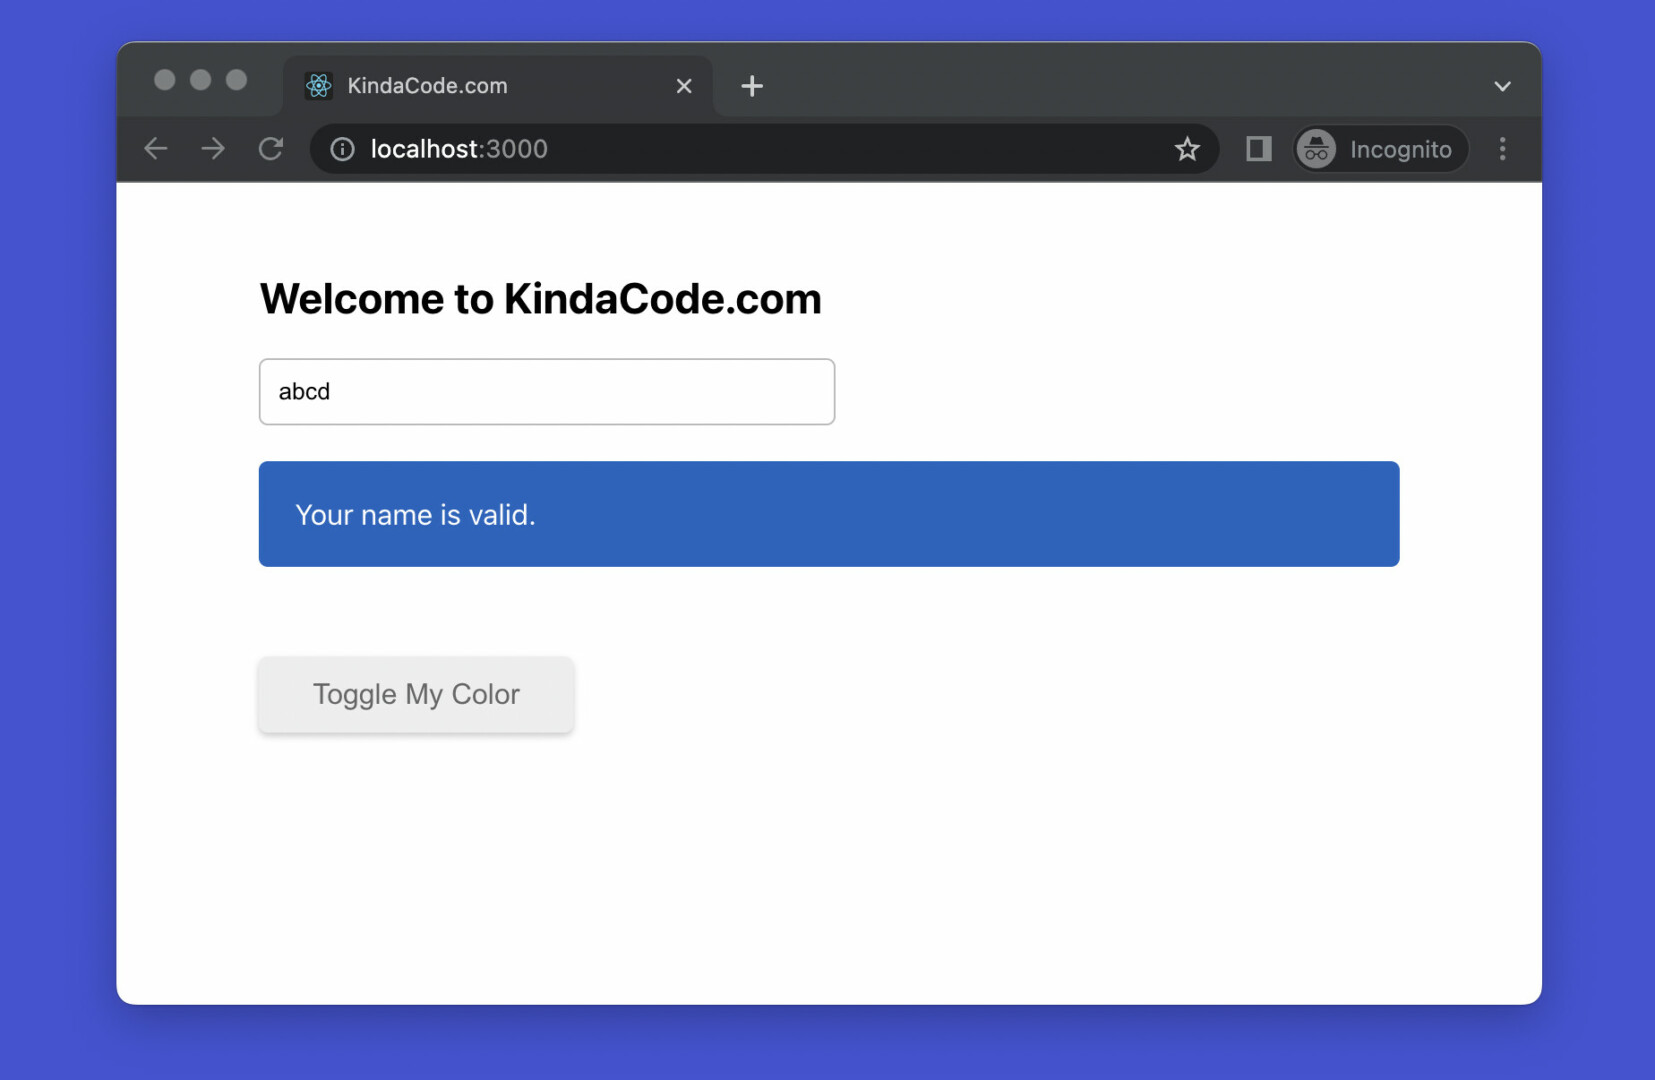
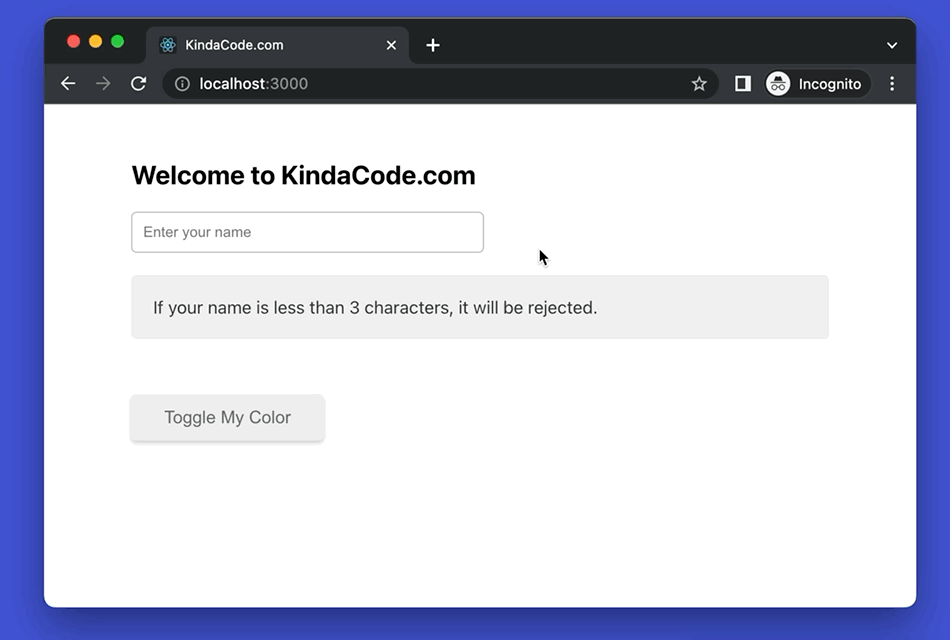
App Preview
The tiny React project we’re going to build presents a text input and box that contains a message. A name entered into the text input is considered valid if its length is equal to or more than 3 characters. The color of the box can be one of the following:
- Gray: If the input is empty
- Red: If the name provided is from 1 to 3 characters
- Blue: If the name entered is valid
Another component of our React app is a button that can change its background color on click.
Here’s the demo:
The Code
1. Initialize a new React project by performing the command below:
npx create-react-app kindacode-exampleAs of now, we’ll focus on these 2 files: src/App.js and src/App.css. Other files will be intact.
2. Replace all of the default code in your src/App.js with the following (you can see explanations in the comments):
// KindaCode.com
// src/App.js
import { useRef, useState } from 'react';
import './App.css';

function App() {
  const messageRef = useRef();

  const [message, setMessage] = useState(
    'If your name is less than 3 characters, it will be rejected.'
  );

  // this function will be triggered when the input changes
  const inputChangeHandler = (e) => {
    const enteredText = e.target.value;

    // In the beginning or when the user deletes everything, use the default style
    if (enteredText.length === 0) {
      setMessage(
        'If your name is less than 3 characters, it will be rejected.'
      );
      messageRef.current.classList.remove('message--error', 'message--success');
      messageRef.current.classList.add('message--default');
    } else if (enteredText.length < 3) {
      setMessage('Your name is too short.');
      messageRef.current.classList.remove(
        'message--default',
        'message--success'
      );
      messageRef.current.classList.add('message--error');
    } else {
      setMessage('Your name is valid.');
      messageRef.current.classList.remove('message--default', 'message--error');
      messageRef.current.classList.add('message--success');
    }
  };

  // this function is called when the button gets clicked
  const buttonClickHandler = (e) => {
    e.currentTarget.classList.toggle('button--dark');
    e.currentTarget.classList.toggle('button--light');
  };

  return (
    <>
      <div className='container'>
        <div>
          <h2>Welcome to KindaCode.com</h2>
          <input
            type='text'
            onChange={inputChangeHandler}
            placeholder='Enter your name'
            className='input'
          />
        </div>
        <div ref={messageRef} className='message message--default'>
          {message}
        </div>

        <button onClick={buttonClickHandler} className='button button--light'>
          Toggle My Color
        </button>
      </div>
    </>
  );
}

export default App;
3. Empty your src/App.css file, then add the following:
.container {
  width: 80%;
  margin: 50px auto;
}

/* classes related to the text input and the message */
.input {
  width: 300px;
  padding: 10px 10px;
  border: 1px solid #bbb;
  border-radius: 5px;
}

.message {
  margin-top: 20px;
  padding: 20px;
  border-radius: 5px;
}

.message--default {
  background-color: #f1f1f1;
  color: #333;
}

.message--error {
  background: #e53935;
  color: white;
}

.message--success {
  background: #1565c0;
  color: white;
}

/* classes related to the button */
.button {
  margin-top: 50px;
  padding: 12px 30px;
  font-size: 16px;
  border: none;
  border-radius: 5px;
  box-shadow: 0 2px 4px rgba(0, 0, 0, 0.2);
  cursor: pointer;
}

.button--light {
  background: #eee;
  color: #666;
}

.button--dark {
  background: #666;
  color: #fff;
}
4. Boot it up and go to http://localhost:3000 to see the result.
Conclusion
You’ve learned the technique to add and remove CSS classes in React without using any third-party packages. If you want to consolidate your programming skills and explore more new and interesting things in the modern React world, take a look at the following articles:
- How to Use Styled JSX in React: A Deep Dive
- React + TypeScript: Making a Reading Progress Indicator
- React + TypeScript: Making a Custom Context Menu
- React: Show Image Preview before Uploading
- React: Show a Loading Dialog (without 3rd libraries)
- React + TypeScript: Multiple Dynamic Checkboxes
You can also check our React category page and React Native category page for the latest tutorials and examples.