


This hands-on, low-word, code-rich article walks you through a complete example of creating a fullscreen search overlay in React. We’ll build everything from the ground up with hooks and pure CSS. No third-party packages are required.
Without any further ado, let’s get started.
Table of Contents
The Example
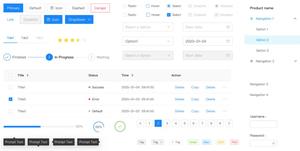
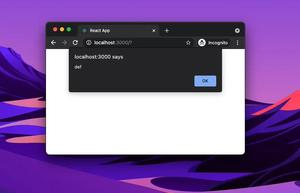
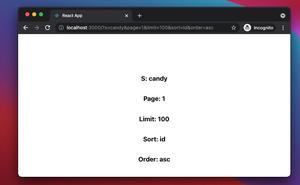
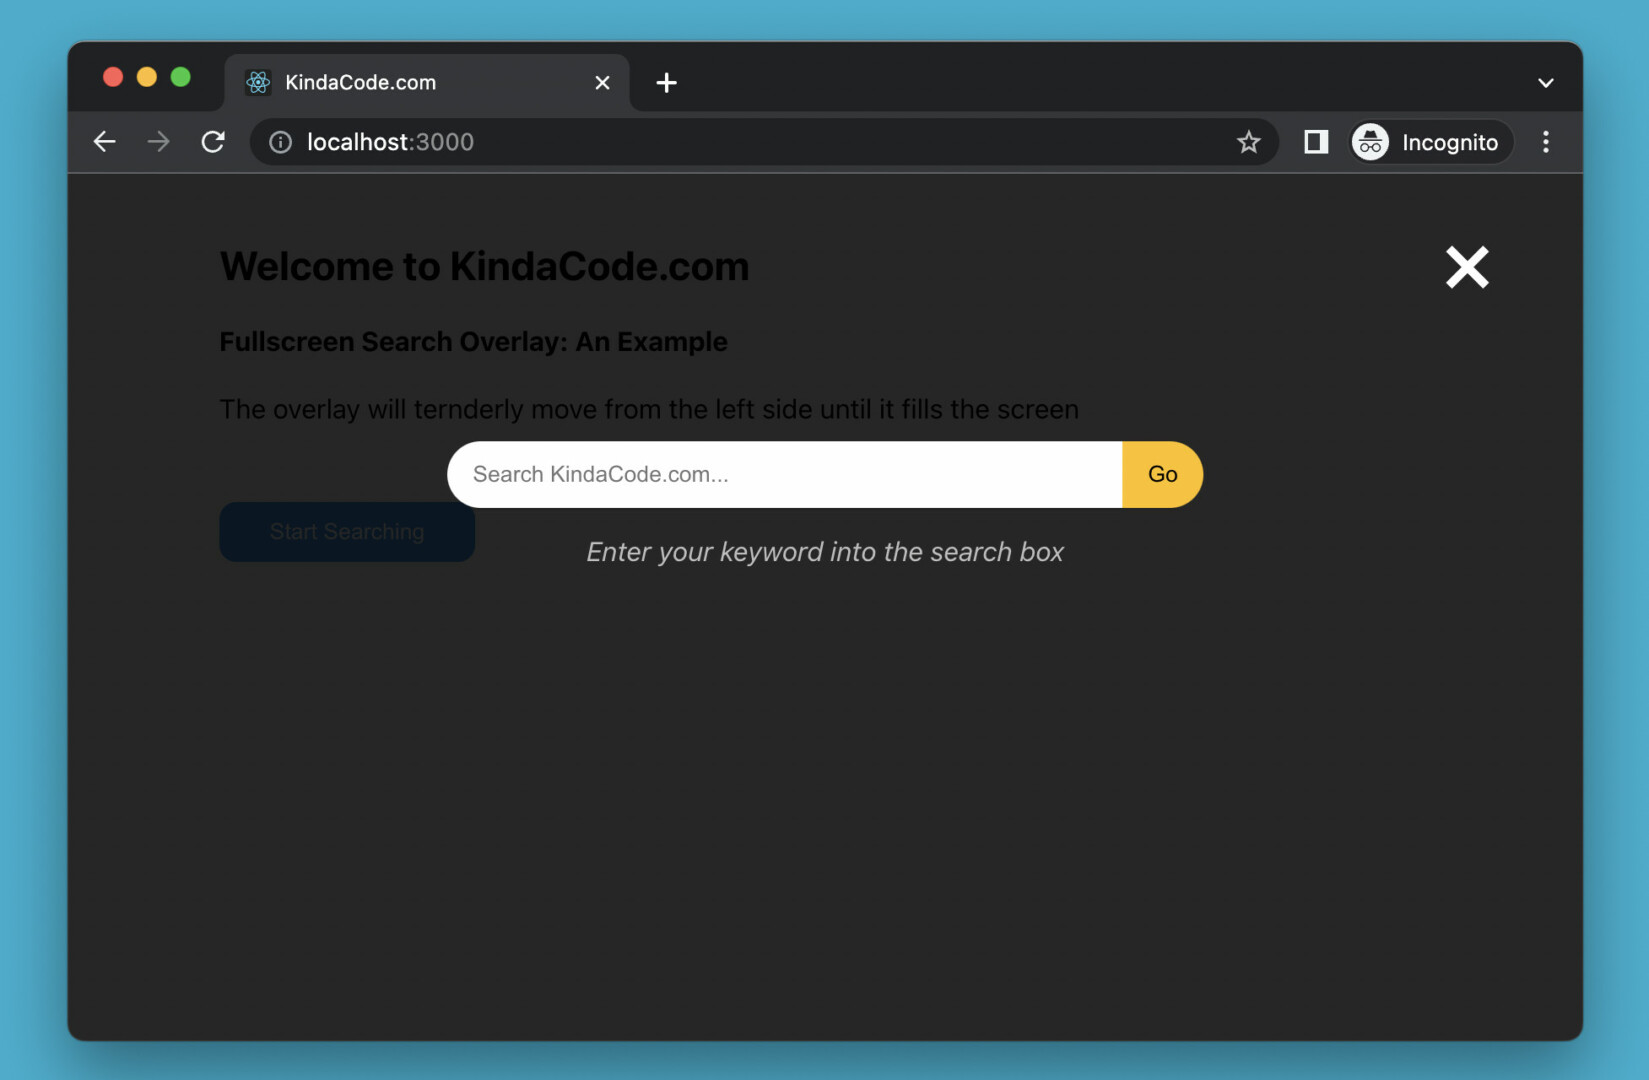
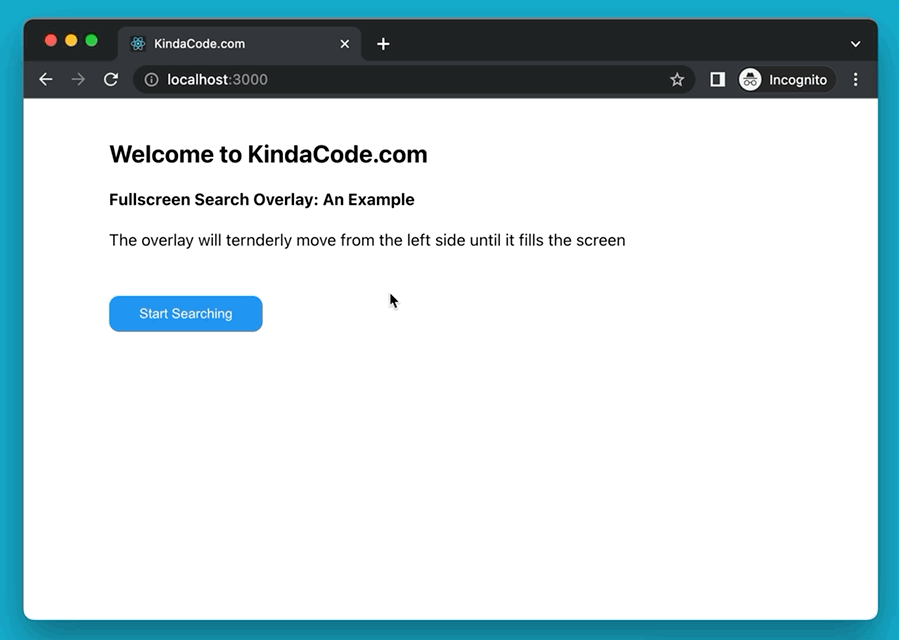
App Preview
The small demo we’re going to make has a blue button (in real-world projects, it is usually placed on a navbar). When this button gets clicked, our fullscreen modal with a semi-transparent dark background will show up. t does not appear suddenly but will expand smoothly, tenderly from the left side until it reaches full size. There is a white close button (X) in the upper right corner that is used to close the overlay modal.
An illustration is worth more than a thousand words:
The Code
1. Initialize a fresh new React project:
npx create-react-app kindacode-search-overlay-exampleThe project name is totally up to you. Choose whatever you like.
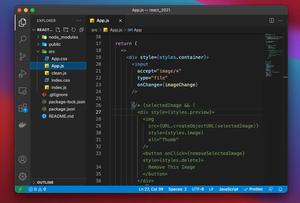
2. The full source code in src/App.js with explanations:
// KindaCode.com
// src/App.js
import { useRef } from 'react';
import './App.css';
function App() {
// This ref will be connected to the overlay div
const overlayRef = useRef();
// This function is called when the "Start Searching" button gets clicked
const openSearch = () => {
overlayRef.current.style.width = '100%';
};
// This function is called when the "Close" button is clicked
const closeSearch = () => {
overlayRef.current.style.width = '0%';
};
return (
<>
{/* Main content */}
<div class='main'>
<h2>Welcome to KindaCode.com</h2>
<h4>Fullscreen Search Overlay: An Example</h4>
<p>
The overlay will ternderly move from the left side until it fills the
screen
</p>
<button onClick={openSearch} className='open-button'>
Start Searching
</button>
</div>
{/* The search overlay */}
<div ref={overlayRef} class='overlay'>
<button class='close-button' onClick={closeSearch}>
×
</button>
<div class='overlay-content'>
<form>
<input
type='search'
placeholder='Search KindaCode.com...'
className='search-input'
/>
<button
className='search-button'
onClick={() => {
console.log('Hi there');
/* Your search logic here */
}}
>
Go
</button>
<p className='search-text'>
Enter your keyword into the search box
</p>
</form>
</div>
</div>
</>
);
}
export default App;3. CSS is an indispensable part of our app. Remove all of the default code in your src/App.css and then add the following:
.main {
  width: 80%;
  margin: 40px auto;
}

/* Style the overlay */
.overlay {
  height: 100%;
  width: 0;
  position: fixed;
  z-index: 1;
  top: 0;
  left: 0;
  background-color: rgba(0, 0, 0, 0.85);
  transition: 0.5s;
  overflow-x: hidden;
}

.overlay-content {
  position: relative;
  top: 25%;
  width: 100%;
  text-align: center;
  margin-top: 30px;
}

/* Style the open button */
.open-button {
  margin-top: 30px;
  padding: 10px 30px;
  background: #2196f3;
  color: #fff;
  cursor: pointer;
  border: none;
  border-radius: 10px;
}

.open-button:hover {
  background: #0b7dda;
}

/* Style the "Close" button */
.close-button {
  position: absolute;
  top: 20px;
  right: 45px;
  font-size: 60px;
  border: none;
  background: transparent;
  cursor: pointer;
  color: #fff;
}

/* Style search elements */
.search-input {
  width: 400px;
  padding: 12px 15px;
  border: none;
  outline: none;
  border-radius: 30px 0px 0px 30px;
}

.search-button {
  padding: 12px 15px;
  border: none;
  cursor: pointer;
  background: #ffc107;
  border-radius: 0px 30px 30px 0px;
  transition: 0.3s;
}

.search-button:hover {
  background: #ff9800;
}

.search-text {
  color: rgba(255, 255, 255, 0.7);
  font-style: italic;
}
4. Run your app in the development mode:
npm startAnd go to http://localhost:3000 to view the result. Try to modify the code, add some things, remove some things, change some CSS values, and see what happens next.
Conclusion
You’ve learned how to implement a fullscreen search box from scratch in React. Many modern web applications use this design to save space and increase the user experience. If you’d like to explore more new and awesome stuff in the frontend development world, take a look at the following articles:
- 3 Ways to Create Toasts in React
- React + TypeScript: Handling onScroll event
- React + TypeScript: Password Strength Checker example
- How to create a Filter/Search List in React
- React Router: How to Create a Custom Back Button
- React + TypeScript: Multiple Dynamic Checkboxes
You can also check our React category page and React Native category page for the latest tutorials and examples.