


This article walks you through 2 examples that demonstrate how to get the device identifier in Flutter.
Using platform_device_id
If you need only the id of the device that your app is running on, the simplest and quickest solution is to use the platform_device_id package. It works on Android (AndroidId), iOS (IdentifierForVendor), Windows (BIOS UUID), macOS (IOPlatformUUID), and Linux (BIOS UUID). In Flutter web applications, you will get UserAgent (this information isn’t unique).
App Preview
The sample app we are going to build contains a floating button. When this button is pressed, the device’s id will be displayed on the screen. Here’s how it works on iOS and Android:
The Code
1. Install the plugin by running:
flutter pub add platform_device_idThen execute this command:
flutter pub getNo special permissions or configurations are required.
2. The complete code:
// main.dart
import 'package:flutter/material.dart';
import 'package:platform_device_id/platform_device_id.dart';

void main() {
  runApp(const MyApp());
}

class MyApp extends StatelessWidget {
  const MyApp({Key? key}) : super(key: key);
  @override
  Widget build(BuildContext context) {
    return MaterialApp(
        // Remove the debug banner
        debugShowCheckedModeBanner: false,
        title: 'KindaCode.com',
        theme: ThemeData(
          primarySwatch: Colors.indigo,
        ),
        home: const HomePage());
  }
}

class HomePage extends StatefulWidget {
  const HomePage({Key? key}) : super(key: key);

  @override
  State<HomePage> createState() => _HomePageState();
}

class _HomePageState extends State<HomePage> {
  String? _id;

  // This function will be called when the floating button is pressed
  void _getInfo() async {
    // Get device id
    String? result = await PlatformDeviceId.getDeviceId;

    // Update the UI
    setState(() {
      _id = result;
    });
  }

  @override
  Widget build(BuildContext context) {
    return Scaffold(
      appBar: AppBar(title: const Text('KindaCode.com')),
      body: Padding(
        padding: const EdgeInsets.all(20),
        child: Center(
            child: Text(
          _id ?? 'Press the button',
          style: TextStyle(fontSize: 20, color: Colors.red.shade900),
        )),
      ),
      floatingActionButton: FloatingActionButton(
          onPressed: _getInfo, child: const Icon(Icons.play_arrow)),
    );
  }
}
Using device_info_plus
The package device_info_plus gives you the device’s id as platform_device_id and provides other detailed information about the device (make, model, etc.) and the Android or iOS version your Flutter app is running on.
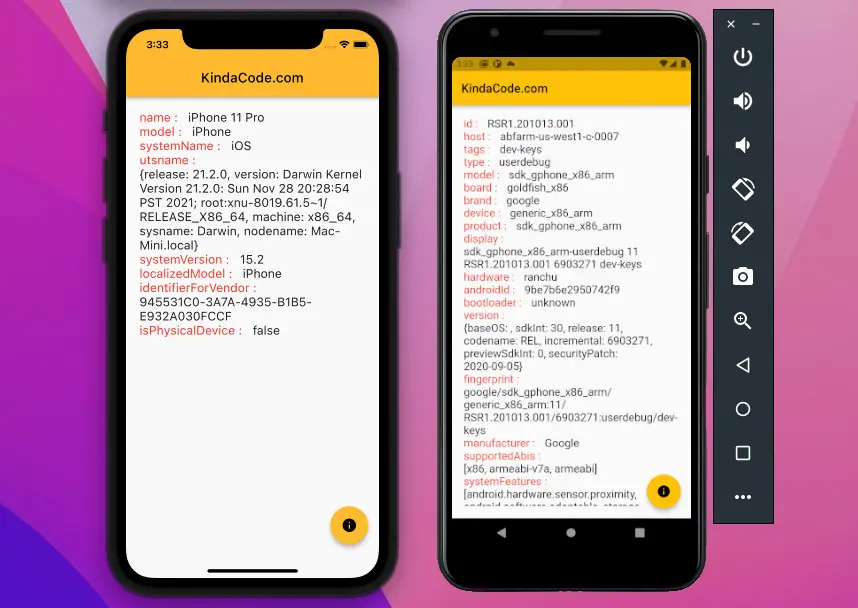
App Preview
The app that we will make is quite similar to the one in the previous example. However, this time we will display lots of text on the screen. The results returned vary and are platform-dependent. As you can see, the amount of information returned on Android is much more than on iOS.
The Code
1. Install the plugin by performing the following:
flutter pub add device_info_plusThen run:
flutter pub get2. The full source code in main.dart:
// main.dart
import 'package:flutter/material.dart';
import 'package:device_info_plus/device_info_plus.dart';

void main() {
  runApp(const MyApp());
}

class MyApp extends StatelessWidget {
  const MyApp({Key? key}) : super(key: key);
  @override
  Widget build(BuildContext context) {
    return MaterialApp(
        // Remove the debug banner
        debugShowCheckedModeBanner: false,
        title: 'KindaCode.com',
        theme: ThemeData(
          primarySwatch: Colors.amber,
        ),
        home: const HomePage());
  }
}

class HomePage extends StatefulWidget {
  const HomePage({Key? key}) : super(key: key);

  @override
  State<HomePage> createState() => _HomePageState();
}

class _HomePageState extends State<HomePage> {
  Map? _info;

  // This function is triggered when the floating button gets pressed
  void _getInfo() async {
    // Instantiating the plugin
    final deviceInfoPlugin = DeviceInfoPlugin();

    final result = await deviceInfoPlugin.deviceInfo;
    setState(() {
      _info = result.data;
    });
  }

  @override
  Widget build(BuildContext context) {
    return Scaffold(
      appBar: AppBar(title: const Text('KindaCode.com')),
      body: _info != null
          ? Padding(
              padding: const EdgeInsets.all(20),
              child: ListView(
                children: _info!.entries
                    .map((e) => Wrap(
                          children: [
                            Text(
                              "${e.key} :",
                              style: const TextStyle(
                                  fontSize: 18, color: Colors.red),
                            ),
                            const SizedBox(
                              width: 15,
                            ),
                            Text(
                              e.value.toString(),
                              style: const TextStyle(
                                fontSize: 18,
                              ),
                            )
                          ],
                        ))
                    .toList(),
              ),
            )
          : const Center(
              child: Text('Press the button'),
            ),
      floatingActionButton: FloatingActionButton(
        onPressed: _getInfo,
        child: const Icon(Icons.info),
      ),
    );
  }
}
Conclusion
We’ve covered a couple of techniques to read the device information. Choose the one that fits your needs to implement in your project. If you’d like to explore more new and amazing stuff about the modern Flutter world, take a look at the following articles:
- Flutter: ExpansionTile examples
- 3 Ways to Cancel a Future in Flutter and Dart
- Flutter: Convert UTC Time to Local Time and Vice Versa
- Create a Custom NumPad (Number Keyboard) in Flutter
- Flutter: Creating OTP/PIN Input Fields (2 approaches)
- Flutter: Making Beautiful Chat Bubbles (2 Approaches)
You can also tour our Flutter topic page and Dart topic page to see the latest tutorials and examples.


