


This article shows you how to make a TextFiled read-only or disabled in Flutter.
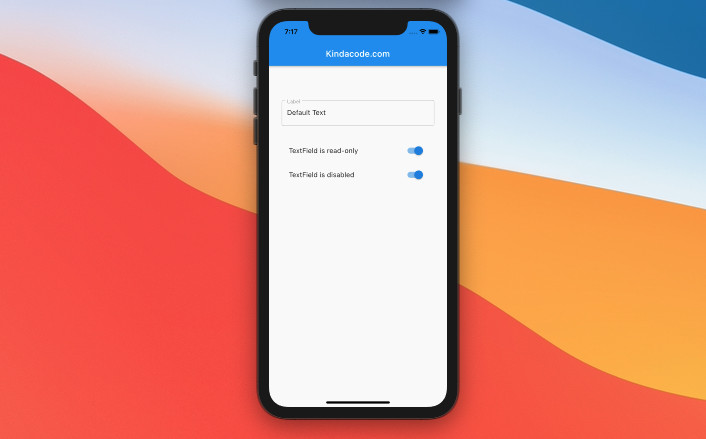
Table of Contents
Overview
If a TextField is disabled, it can not be focused and ignores taps. We can control whether a TextField is disabled or enabled by setting its enable property to false or true, respectively.
TextField(
  enable: // "true" or "false"
),
If a TextField is read-only, it can be focused and its text is still selectable. However, the text can NOT be modified by any shortcut or keyboard operation. We can control whether a TextField is read-only or not by setting its readOnly property to true or false, respectively.
TextField(
  readOnly: // "true" or "false"
),
An example is worth more than a thousand of words. Let’s see the code.
Example
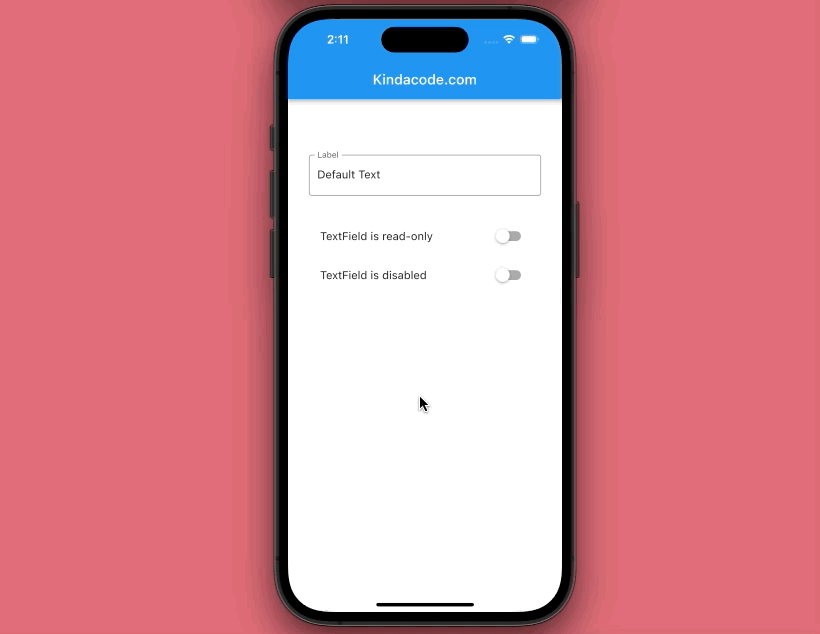
Preview
This example app contains a text field (TextField is used but you can use TextFormField as well) and 2 switches (SwitchListTile). By using the first switch, we can make the text field become read-only or not read-only. By using the second switch, we can disable or enable the text field.
The code
Here’s the full source code in main.dart (with explanations). It has been recently updated to work properly with the latest versions of Flutter.
// main.dart
import 'package:flutter/material.dart';

void main() {
  runApp(const MyApp());
}

class MyApp extends StatelessWidget {
  const MyApp({Key? key}) : super(key: key);

  @override
  Widget build(BuildContext context) {
    return const MaterialApp(
      // Remove the debug banner
      debugShowCheckedModeBanner: false,
      title: 'Kindacode.com',
      home: HomePage(),
    );
  }
}

class HomePage extends StatefulWidget {
  const HomePage({Key? key}) : super(key: key);

  @override
  State<HomePage> createState() => _HomePageState();
}

class _HomePageState extends State<HomePage> {
  // This controller is connected to the text field
  late TextEditingController _controller;

  // Whether the textfield is read-only or not
  bool _isReadonly = false;

  // Whether the text field is disabled or enabled
  bool _isDisabled = false;

  @override
  void initState() {
    _controller = TextEditingController(text: 'Default Text');
    super.initState();
  }

  @override
  Widget build(BuildContext context) {
    return Scaffold(
      appBar: AppBar(
        title: const Text('Kindacode.com'),
      ),
      body: Padding(
        padding: const EdgeInsets.symmetric(vertical: 80, horizontal: 30),
        child: Column(
          children: [
            TextField(
              readOnly: _isReadonly,
              enabled: !_isDisabled,
              // _isDisabled = false -> enbalbe = true
              // _isDisabled = true -> enable = false

              controller: _controller,
              decoration: const InputDecoration(
                labelText: 'Label',
                border: OutlineInputBorder(),
              ),
            ),
            const SizedBox(
              height: 30,
            ),
            SwitchListTile(
              value: _isReadonly,
              onChanged: (value) {
                setState(() {
                  _isReadonly = value;
                });
              },
              title: const Text('TextField is read-only'),
            ),
            SwitchListTile(
              value: _isDisabled,
              onChanged: (value) {
                setState(() {
                  _isDisabled = value;
                });
              },
              title: const Text('TextField is disabled'),
            ),
          ],
        ),
      ),
    );
  }
}
Conclusion
You’ve learned how to make a TextField become disabled or read-only. Continue learning more about TextField and other interesting things in Flutter by taking a look at the following articles:
- Flutter: Adding a Clear Button to a TextField
- Flutter: Add a Character Counter to TextField
- Flutter: Show/Hide Password in TextField/TextFormField
- Flutter StreamBuilder examples
- Flutter and Firestore Database: CRUD example
You can also check out our Flutter topic page or Dart topic page for the latest tutorials and examples.


