


This article covers the basics of Cupertino (iOS-style) widgets in Flutter.
Overview
There are some important things you should be aware of before implementing Cupertino widgets in your project:
- Cupertino widgets respect platform differences and hence don’t support all features of Material widgets.
- Using the Cupertino widgets is optional even when you’re building apps for only iOS devices.
- Only some Cupertino widgets will work in a MaterialApp/ Scaffold widget.
- You can use Cupertino and Material widgets in the same codebase to create a different feel for iOS and Android users. However, you will need to write more checks, and the code will be more verbose. To detect the current OS that your app is running on, see this article.
A Complete Example
This example shows you how to use a few popular Cupertino widgets (CupertinoPageScaffold, CupertinoNavigationBar, CupertinoButton, CupertinoTextField, CupertinoTimerPicker) as well as CupertinoThemeData.
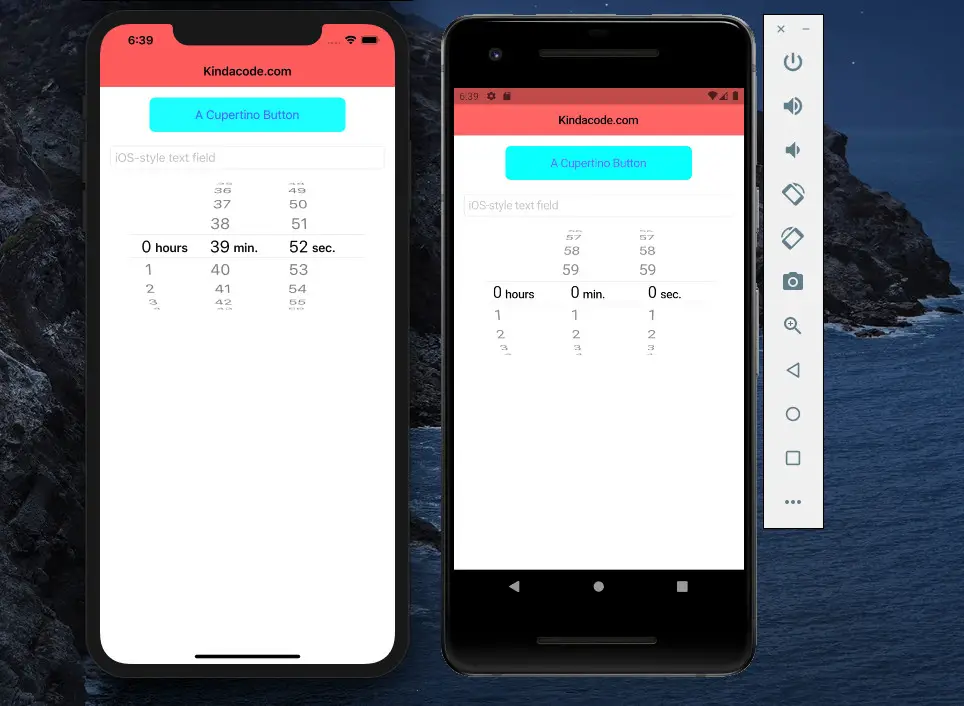
The full source code in main.dart (with explanations):
import 'package:flutter/cupertino.dart';
import 'package:flutter/foundation.dart';

void main() {
  runApp(const MyApp());
}

class MyApp extends StatelessWidget {
  const MyApp({Key? key}) : super(key: key);

  @override
  Widget build(BuildContext context) {
    return const CupertinoApp(
      debugShowCheckedModeBanner: false,
      title: "Kindacode.com",
      theme: CupertinoThemeData(
          primaryColor: Color.fromARGB(255, 10, 10, 255), // primary color
          primaryContrastingColor:
              Color.fromARGB(255, 100, 100, 255), // accent color
          barBackgroundColor:
              Color.fromARGB(255, 255, 100, 100) // navigation bar background
          ),
      home: HomePage(),
    );
  }
}

class HomePage extends StatelessWidget {
  const HomePage({Key? key}) : super(key: key);

  @override
  Widget build(BuildContext context) {
    return CupertinoPageScaffold(
      // navigation bar
      navigationBar: const CupertinoNavigationBar(
        middle: Text('Kindacode.com'),
      ),

      // some simple widgets
      child: Padding(
        padding: const EdgeInsets.all(15),
        child: Column(
          children: [
            // iOS-style button
            CupertinoButton(
              color: const Color.fromARGB(255, 10, 255, 255),
              onPressed: () {},
              child: const Text(
                'A Cupertino Button',
              ),
            ),

            const SizedBox(height: 20),

            // A Cupertino Text Field
            const CupertinoTextField(
              placeholder: "iOS-style text field",
            ),

            // an iOS-style time picker
            CupertinoTimerPicker(onTimerDurationChanged: (pickedTime) {
              if (kDebugMode) {
                print(pickedTime);
              }
            })
          ],
        ),
      ),
    );
  }
}
Continue learning more about Cupertino stuff in Flutter by taking a look at the following articles (each will go into more detail):
- Flutter Cupertino Button – Tutorial and Examples
- Flutter CupertinoSegmentedControl Example
- How to use Cupertino icons in Flutter
- Flutter CupertinoDialog Example
- Working with Cupertino Date Picker in Flutter
- Example of CupertinoSliverNavigationBar in Flutter
You can also check out our Flutter category page or Dart category page for the latest tutorials and examples.


