

There are many times you need to implement a date picker that lets the user select a date and time for some purposes, such as setting an alarm clock, scheduling an event, choosing someone’s date of birth, etc. If you are making an app in iOS style with Flutter, you may want to use CupertinoDatePicker. In general, CupertinoDatePicker goes along with showCupertinoModalPopup() or showCupertinoDialog().
In this article, we will go over a complete example of implementing CupertinoDatePicker and have a look at its available options.
Table of Contents
Example
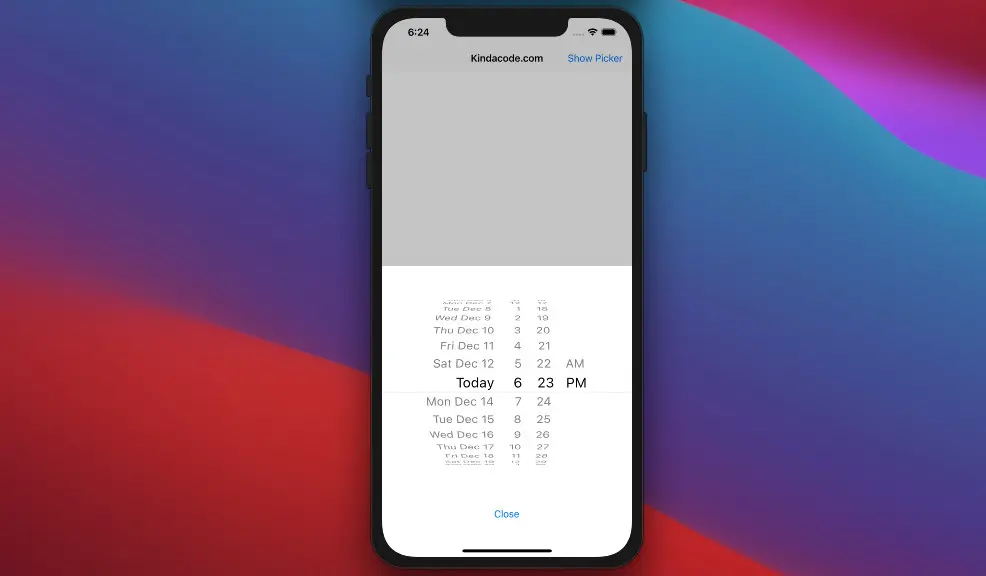
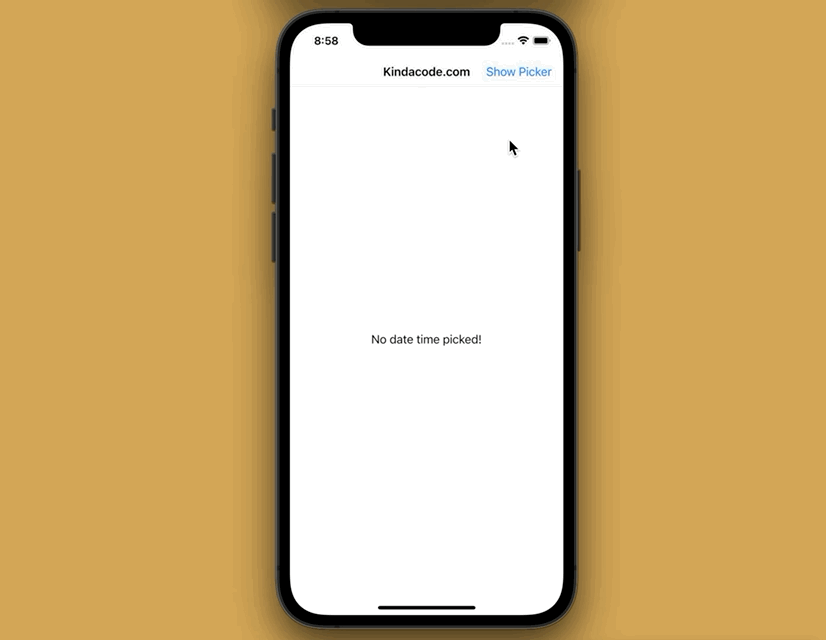
In this example, we’ll create a tiny Flutter app that has a button. When the user clicks this button, a modal popup will show up. This modal popup contains a CupertinoDatePicker and a button used to close the modal. Our app also has a Text widget that displays the date and time picked from the CupertinoDatePicker.
Besides CupertinoDatePicker, we’ll use the showCupertinoModalPopup() function to display the date picker at the bottom of the screen.
App Preview
The Code
Don’t forget to import the cupertino library:
import 'package:flutter/cupertino.dart';Here’s the full source code:
// main.dart
import 'package:flutter/cupertino.dart';

void main() {
  runApp(const MyApp());
}

class MyApp extends StatelessWidget {
  const MyApp({Key? key}) : super(key: key);

  @override
  Widget build(BuildContext context) {
    return const CupertinoApp(
      // hide the debug banner
      debugShowCheckedModeBanner: false,
      title: "Kindacode.com",
      home: HomePage(),
    );
  }
}

class HomePage extends StatefulWidget {
  const HomePage({Key? key}) : super(key: key);

  @override
  State<HomePage> createState() => _HomePageState();
}

class _HomePageState extends State<HomePage> {
  DateTime? _chosenDateTime;

  // Show the modal that contains the CupertinoDatePicker
  void _showDatePicker(ctx) {
    // showCupertinoModalPopup is a built-in function of the cupertino library
    showCupertinoModalPopup(
        context: ctx,
        builder: (_) => Container(
              height: 500,
              color: const Color.fromARGB(255, 255, 255, 255),
              child: Column(
                children: [
                  SizedBox(
                    height: 400,
                    child: CupertinoDatePicker(
                        initialDateTime: DateTime.now(),
                        onDateTimeChanged: (val) {
                          setState(() {
                            _chosenDateTime = val;
                          });
                        }),
                  ),

                  // Close the modal
                  CupertinoButton(
                    child: const Text('OK'),
                    onPressed: () => Navigator.of(ctx).pop(),
                  )
                ],
              ),
            ));
  }

  @override
  Widget build(BuildContext context) {
    return CupertinoPageScaffold(
      navigationBar: CupertinoNavigationBar(
        middle: const Text('Kindacode.com'),
        // This button triggers the _showDatePicker function
        trailing: CupertinoButton(
          padding: EdgeInsetsDirectional.zero,
          child: const Text('Show Picker'),
          onPressed: () => _showDatePicker(context),
        ),
      ),
      child: SafeArea(
        child: Center(
          child: Text(_chosenDateTime != null
              ? _chosenDateTime.toString()
              : 'No date time picked!'),
        ),
      ),
    );
  }
}
This article aims to help you get acquainted with CupertinoDatePicker so we don’t spend much time on the UI. You can improve it on your own. In case you want to format the selected date time to make it neater and easier to read, see this article: 4 Ways to Format DateTime in Flutter.
API
Constructor
CupertinoDatePicker({
  Key? key,
  CupertinoDatePickerMode mode = CupertinoDatePickerMode.dateAndTime,
  required ValueChanged<DateTime> onDateTimeChanged,
  DateTime? initialDateTime, DateTime? minimumDate,
  DateTime? maximumDate,
  int minimumYear = 1,
  int? maximumYear,
  int minuteInterval = 1,
  bool use24hFormat = false,
  DatePickerDateOrder? dateOrder,
  Color? backgroundColor,
  bool showDayOfWeek = false,
  double itemExtent = _kItemExtent
})
Options
| Parameter | Type/Class | Description |
|---|---|---|
| backgroundColor | Color | The background color of the date picker |
| maximumDate | DateTime | The maximum selectable date that the picker can settle on |
| maximumYear | int | The maximum year that the picker can be scrolled to |
| minimumDate | DateTime | The minimum selectable date that the picker can settle on |
| minimumYear | int | The minimum year that the picker can be scrolled to |
| initialDateTime | DateTime | Defaults to the present date and time and must not be null. The present must conform to the intervals set in minimumDate, maximumDate, minimumYear, and maximumYear. |
| minuteInterval | int | The granularity of the minute’s spinner, if it is shown in the current mode. Must be an integer factor of 60. |
| mode | CupertinoDatePickerMode | CupertinoDatePickerMode.dateAndTime (both date & time), CupertinoDatePickerMode.date (date only), CupertinoDatePickerMode.time (time only) |
| onDateTimeChanged (Required) | ValueChanged | Callback called when the selected date and/or time changes |
| use24hFormat | bool | Whether to use the 24-hour format. Defaults to false. |
| dateOrder | DatePickerDateOrder | Determines the order of the columns (available options: DatePickerDateOrder.dmy, DatePickerDateOrder.mdy, DatePickerDateOrder.ydm, DatePickerDateOrder.ymd) |
Conclusion
This article went over the fundamentals of using CupertinoDatePicker to make an iOS-style appearance for your apps. If you’d like to learn more new and interesting stuff about Flutter, take a look at the following articles:
- Using GetX (Get) for State Management in Flutter
- Flutter and Firestore Database: CRUD example
- Flutter & Hive Database: CRUD Example
- Working with material Time Picker in Flutter (Null Safety)
- Flutter Cupertino Button – Tutorial and Examples
- Making Circle Icon Buttons in Flutter (5 methods)
- How to find the iOS Bundle ID of a Flutter project
You can also take a tour around our Flutter topic page or Dart topic page for the latest tutorials and examples.


