


Flutter is being updated regularly with many useful features and widgets. One of the useful widgets is Autocomplete. With this friend, we can quickly implement autocomplete text fields without using any third-party plugins. Making a search field with suggestions that appear as the user types something is now neat and easy.
In this article, we will examine a complete example of using the Autocomplete widget in Flutter.
Note: This article was recently updated to work properly with the latest versions of Flutter (3.7.1 or newer) and fix some errors related to null safety.
Table of Contents
The Example
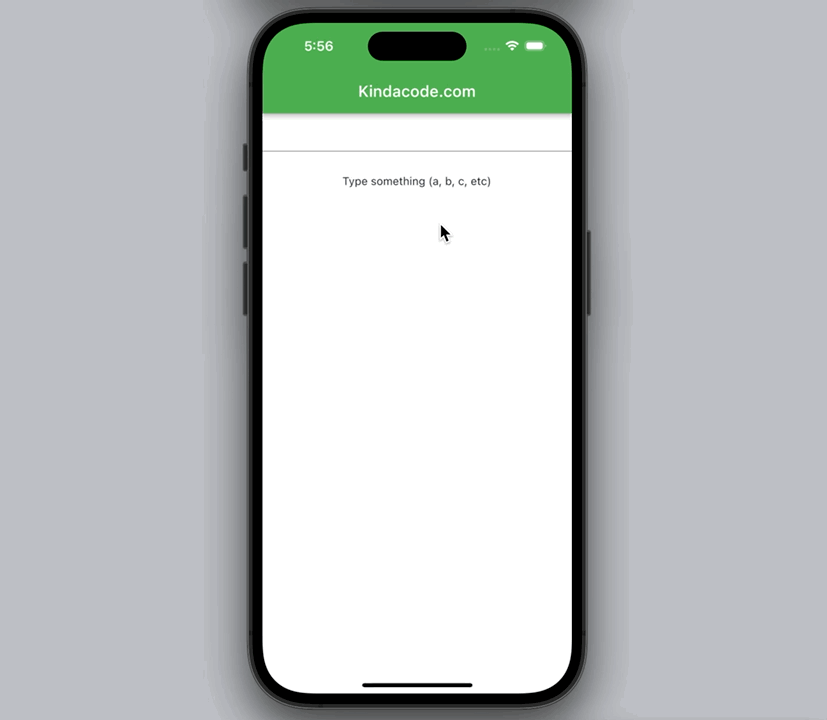
App Preview
In this example app, the user can enter several characters in the search field to look up some animals. The animals whose names match the characters the user entered will appear in the list of suggestions. The one selected from a list of suggestions will appear in the text widget below.
The code
Here is the full code with explanations in the comments:
// main.dart
import 'package:flutter/material.dart';

void main() {
  runApp(const MyApp());
}

class MyApp extends StatelessWidget {
  const MyApp({Key? key}) : super(key: key);

  @override
  Widget build(BuildContext context) {
    return MaterialApp(
      // Remove the debug banner
      debugShowCheckedModeBanner: false,
      title: 'Kindacode.com',
      theme: ThemeData(
        primarySwatch: Colors.green,
      ),
      home: const HomePage(),
    );
  }
}

class HomePage extends StatefulWidget {
  const HomePage({Key? key}) : super(key: key);

  @override
  State<HomePage> createState() => _HomePageState();
}

class _HomePageState extends State<HomePage> {
  // This will be displayed below the autocomplete field
  String? _selectedAnimal;

  // This list holds all the suggestions
  final List<String> _suggestions = [
    'Alligator',
    'Buffalo',
    'Chicken',
    'Dog',
    'Eagle',
    'Frog'
  ];

  @override
  Widget build(BuildContext context) {
    return Scaffold(
      appBar: AppBar(
        title: const Text('Kindacode.com'),
      ),
      body: Column(
        children: [
          Autocomplete<String>(
            optionsBuilder: (TextEditingValue value) {
              // When the field is empty
              if (value.text.isEmpty) {
                return [];
              }

              // The logic to find out which ones should appear
              return _suggestions.where((suggestion) =>
                  suggestion.toLowerCase().contains(value.text.toLowerCase()));
            },
            onSelected: (value) {
              setState(() {
                _selectedAnimal = value;
              });
            },
          ),
          const SizedBox(
            height: 30,
          ),
          Text(_selectedAnimal ?? 'Type something (a, b, c, etc)'),
        ],
      ),
    );
  }
}
Conclusion
This article has walked you through a full example of implementing the Autocomplete widget. From now on, it will be easier for you to create autocomplete text fields when building apps. If you would like to learn more new and interesting things in Flutter, take a look at the following articles:
- Flutter: Copy To Clipboard example (without any plugins)
- Flutter: Safety nesting ListView, GridView inside a Column
- Flutter: Check Internet Connection without any plugins
- Flutter Transform examples – Making fancy effects
- Creating Masonry Layout in Flutter with Staggered Grid View
- Best Libraries for Making HTTP Requests in Flutter
You can also check out our Flutter category page or Dart category page for the latest tutorials and examples.


