

This article walks you through an end-to-end example of implementing the AbsorbPointer widget in a Flutter application.
Table of Contents
A Brief Overview
AbsorbPointer, as the name describes itself, is a built-in widget in Flutter that absorbs pointers. The main reason this widget exists is to provide the ability to disable the interaction of its subtree widgets at once. For example, you can use this widget to prevent a button from being pressed, a list view from being scrolled, a checkbox from being checked or unchecked, a text field from being edited, etc.
Constructor:
AbsorbPointer({
  Key? key,
  bool absorbing = true,
  Widget? child,
  bool? ignoringSemantics
})
When absorbing is set to true, every click inside the widget will be absorbed and all of its descendants become unable to interact with. Otherwise, everything will be able to function normally like without the AbsorbPointer widget.
The Example
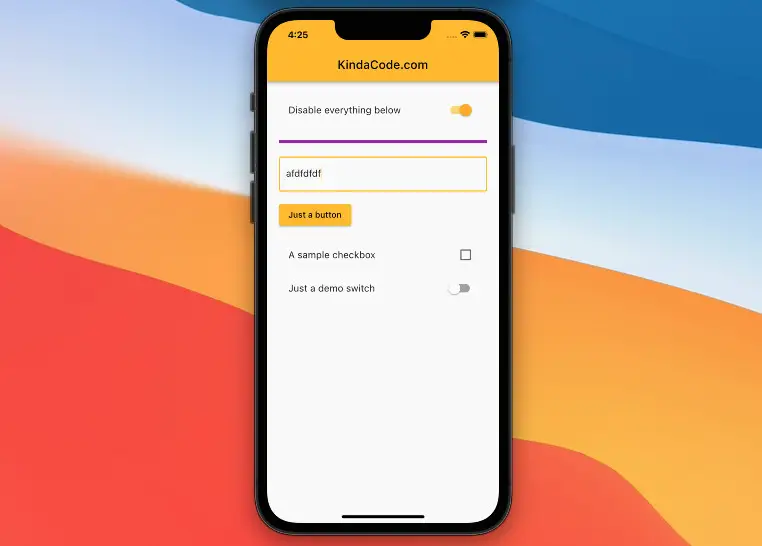
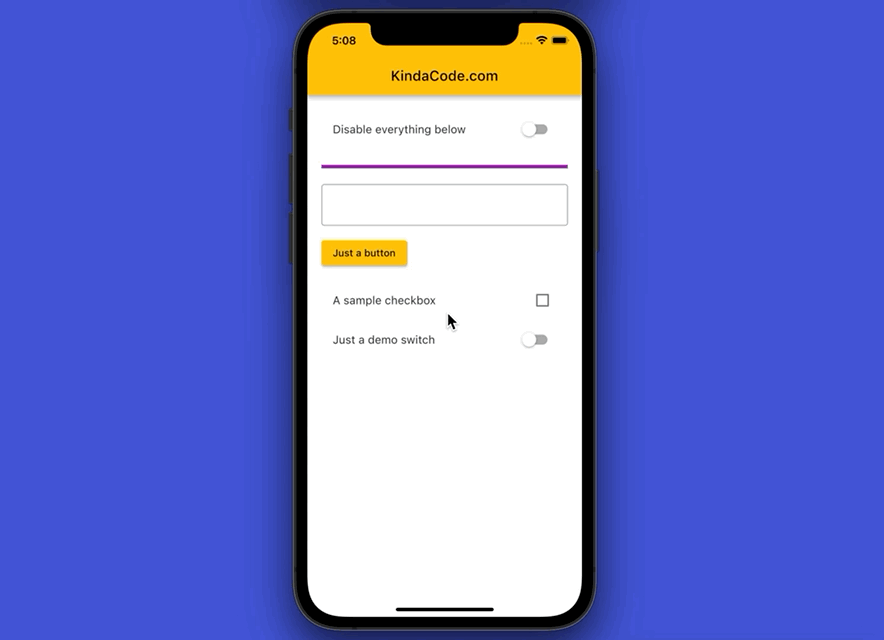
App Preview
In this example, we use an AbsorbPointer to programmatically disable/enable a group of input and control widgets (TextField, Button, Switch, CheckBox). As you will see in the demo below, before we turn OFF the top switch (labeled with “Disable everything below”), all form elements work as usual. Once that switch is ON, we no longer can interact with the control widgets:
The Code
The complete source code with explanations in main.dart:
// main.dart
import 'package:flutter/material.dart';

void main() {
  runApp(const MyApp());
}

class MyApp extends StatelessWidget {
  const MyApp({Key? key}) : super(key: key);

  @override
  Widget build(BuildContext context) {
    return MaterialApp(
      debugShowCheckedModeBanner: false,
      title: 'KindaCode.com',
      theme: ThemeData(useMaterial3: false, primarySwatch: Colors.amber),
      home: const HomePage(),
    );
  }
}

class HomePage extends StatefulWidget {
  const HomePage({Key? key}) : super(key: key);

  @override
  State<HomePage> createState() => _HomePageState();
}

class _HomePageState extends State<HomePage> {
  // This one determines whether the other control elements are able to interact or not
  bool _isAbsorbing = false;

  // These variables are use for other control elements
  bool _isChecked = false; // used for the checkbox
  bool _isOn = false; // used for the switch at the bottom of the column

  @override
  Widget build(BuildContext context) {
    return Scaffold(
      appBar: AppBar(
        title: const Text('KindaCode.com'),
      ),
      body: Padding(
        padding: const EdgeInsets.all(20.0),
        child: Column(
          crossAxisAlignment: CrossAxisAlignment.start,
          children: [
            // This is used to disable/enable other widgets
            SwitchListTile(
                title: const Text('Disable everything below'),
                value: _isAbsorbing,
                onChanged: (_) {
                  setState(() {
                    _isAbsorbing = !_isAbsorbing;
                  });
                }),
            const Divider(
              height: 50,
              thickness: 5,
              color: Colors.purple,
            ),
            // Every widget inside this AbsorbPointer will be disabled/enabled at once
            AbsorbPointer(
              absorbing: _isAbsorbing,
              child: Column(
                crossAxisAlignment: CrossAxisAlignment.start,
                children: [
                  // a TextField
                  const TextField(
                    decoration: InputDecoration(border: OutlineInputBorder()),
                  ),
                  const SizedBox(
                    height: 15,
                  ),
                  // a button
                  ElevatedButton(
                      onPressed: () {}, child: const Text('Just a button')),
                  const SizedBox(
                    height: 15,
                  ),
                  // a checkbox
                  CheckboxListTile(
                      title: const Text('A sample checkbox'),
                      value: _isChecked,
                      onChanged: (_) {
                        setState(() {
                          _isChecked = !_isChecked;
                        });
                      }),
                  // A sample switch
                  SwitchListTile(
                      title: const Text('Just a demo switch'),
                      value: _isOn,
                      onChanged: (_) {
                        setState(() {
                          _isOn = !_isOn;
                        });
                      })
                ],
              ),
            )
          ],
        ),
      ),
    );
  }
}
Conclusion
You’ve learned the fundamentals of the AbsorbPointer widget and examined a complete example of using it in practice. If you’d like to explore more new and exciting stuff about modern Flutter, take a look at the following articles:
- Flutter: Creating OTP/PIN Input Fields (2 approaches)
- Flutter: Making Beautiful Chat Bubbles (2 Approaches)
- Flutter: Adding a Gradient Border to a Container
- Flutter: Firing multiple Futures at the same time with FutureGroup
- Flutter: How to Draw a Heart with CustomPaint
- Flutter: Create a Password Strength Checker from Scratch
You can also check out our Flutter category page or Dart category page for the latest tutorials and examples.


